In this section we would go through the microservices application and deploy the application on the Kubernetes Cluster.
- Download the project from GitHub.
git clone https://github.com/navveenbalani/google-cloud-kubernetes-secure-e2e.git
- Go to the google-cloud-kubernetes-secure-e2e microservice folder. Our microservice comprises of these simple services listed in server.js – echo, healthz, and fecthWebsite.
Echo service listens over POST and sends the request message back as a response:
app.post('/echo', (req, res) => {
  res
    .status(200)
    .json({message: req.body.message})
    .end();
});
The healthz service provides a health status for our services. A Service exposed through an Ingress must respond to health checks from the load balancer. We would specify this URL in the readinessProbe configuration while deploying our service.
The fetchWebsite tests out external connectivity from our private Kubernetes cluster. This basically checks if Cloud NAT is configured properly.
app.get('/fetchWebsite', (req, res) => {

  request('https://navveenbalani.dev/', function (error, response, html) {
  if (!error && response.statusCode == 200) {
    res
    .status(200)
    .json({message: "ok"})
    .end();
  } else {
  	res
    .status(500)
    .json({message: error})
    .end();
  }
})
});
You can deploy your own microservices application but add healthz (or a similar health checkup service) to indicate that the service is healthy and ready.
Build the Microservice Container
In this section, we would build the container. Go to the google-cloud-kubernetes-secure-e2e/microservice folder and execute the following command:
- Build the docker container
> sudo docker build -t kube-e2e-solution .
- Run the container
> sudo docker run -p 49180:8080 -d kube-e2e-solution
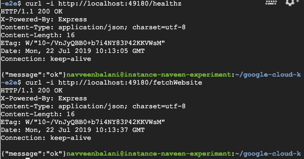
- Execute the service
> curl -i http://localhost:49180/healthz
You should see a 200-status message as shown below.
Figure 14 – Output of curl invocation command
Push the Microservice Container to the Google Container Registry
In this section, we would push the container created in earlier step to Google Container Registry. Google Container Registry provides secure private registry and access controls for your docker containers.
Follow the steps below –
- Tag the image.
> sudo docker tag kube-e2e-solution gcr.io/navveen-api/kube-e2e-solution:v1
This assumes that we would be deploying the container to the gcr.io region. Replace navveen-api by our project name. For deploying to other regions, please refer to https://cloud.google.com/container-registry/docs/pushing-and-pulling.
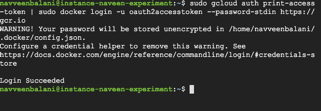
- Create a short lived Access Token to push to container registry (For more details, kindly refer to – https://cloud.google.com/container-registry/docs/advanced-authentication).
> sudo gcloud auth print-access-token | sudo docker login -u oauth2accesstoken –password-stdin https://gcr.io
Figure 15 – Output of access login token command
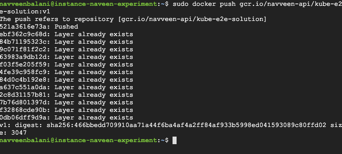
- Push the image to your project (in this case below, navveen-api is the project name).
> sudo docker push gcr.io/navveen-api/kube-e2e-solution:v1
You should see the digest being printed as shown below.
Figure 16 – Output of Docker push command