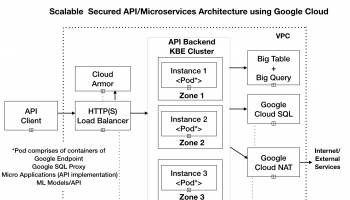
In this article we would go about building the production topology and deploying our microservices application using Google Ingress Controller
Create the VPN
The first step is to create a virtual private network for our solution.
Go to Networking -> VPC Networks – > VPC Network – > Create VPC Network.
We will create a custom subnet in us-east1 region and specify the IP address range so that it is large enough to accommodate our network. For instance, Kubernetes cluster would assign each node a range of IP addresses from the IP address range specified, so that each Pod can have a unique IP address. To know more about how to size the cluster, please check out the Considerations for Cluster Sizing section athttps://cloud.google.com/kubernetes-engine/docs/how-to/alias-ips.
The following is a snapshot of the VPC network that we created for our application. You can use a similar configuration based on your network topology. The below IP address range configuration is large enough to suffice for most networks.
Figure 1 – VPC Network Configuration
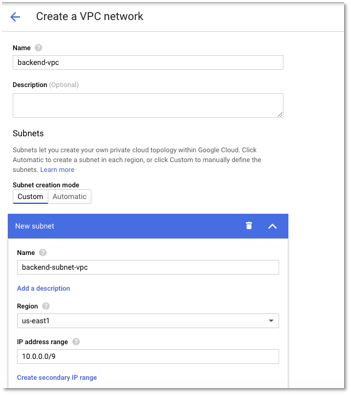
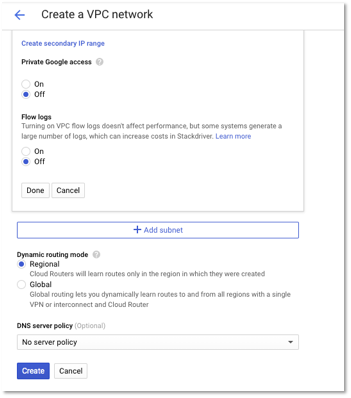
Figure 2 – VPC Network Configuration – Additional Settings
Create a Private Instance of Google Kubernetes Cluster.
Next, we would create a private Google Kubernetes Cluster (GKE). A private cluster ensures that all nodes and the master server (every cluster has a Kubernetes API server called the master) are isolated from the public Internet. You can configure which IPs have access to the master.
You can also set up a Load Balancer that accepts public traffic and directs it to the cluster. For more details, please refer to https://cloud.google.com/kubernetes-engine/docs/how-to/private-clusters.
Go to Kubernetes Cluster – > Clusters – > Create Cluster.
Follow the steps below to create the cluster.
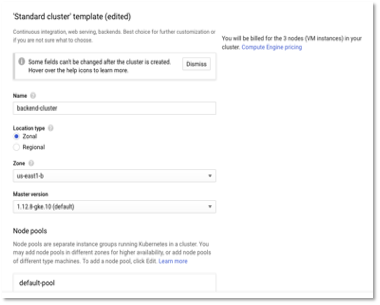
- Create a Standard cluster. Provide the name of the cluster and zone as us-east1-b (i.e. that should be part of the VPN region). The VPN that we created earlier was in the us-east1 region. We can also create a Regional cluster.
Figure 3 – Cluster Configuration
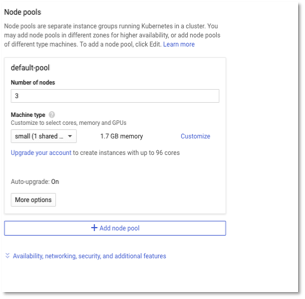
- Enter the number of nodes as 3 and the machine type based on your workloads. For our sample microservices application, a small machine type is good enough. 3 nodes should be good enough to start with since our cluster will auto scale based on workloads.
Figure 4 – Cluster Configuration – Node pools
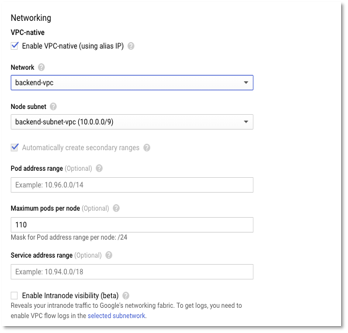
- Click Enable-VPC native and select the VPN network and subnet that was created earlier in Step 1.
Figure 5 – Cluster Configuration – Networking options
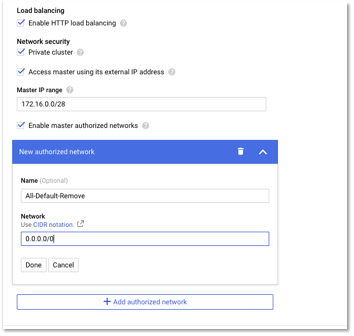
- Select Enable Http Load balancing for the load balancing component. Select Private Cluster and Select Access Master using its external IP address and specify the IP address. Click Enable master authorized networks and specify the IP which can connect the master. We specify 0.0.0.0/0 for now to allow access from any IP address for running the deployment scripts (or you can create a VM in the same VPN network and connect to the master). Please remove the authorized network once the deployment is done.
Figure 6 – Cluster Configuration – Security options
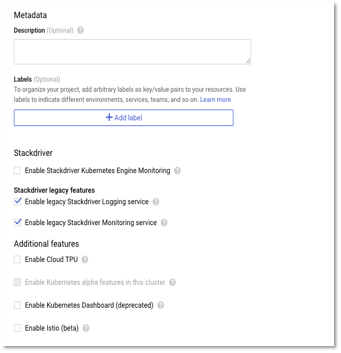
- Next, enable the logging features and create the cluster.
Figure 7 – Cluster Configuration – Logging options
Create Cloud NAT Configuration
In this step, we would create Cloud NAT. Cloud NAT allows VMs instances without external IP addresses and private Google Kubernetes Engine (GKE) clusters to connect to the Internet.
Cloud NAT implements outbound NAT (i.e. network translation, mapping internal IP addresses to external IP) to allow instances to reach the Internet.
Go to Network Services – > Cloud NAT – > Create NAT Gateway
- Enter a name for gateway and select VPC network as backend-vpc (created in Step 1).
- Select the region as us-east 1 (same as the VPC region).
Figure 8 – Create NAT Gateway
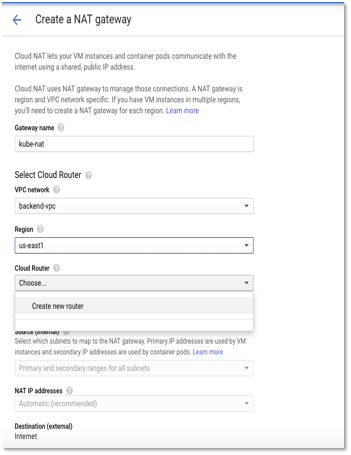
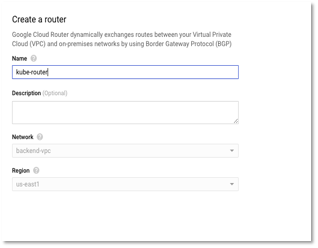
- Click create new Cloud router. Enter the name and click continue. Cloud Router enables dynamic routing for the VPC. For more details, kindly refer to https://cloud.google.com/router/docs/concepts/overview.
Figure 9 – Create Router
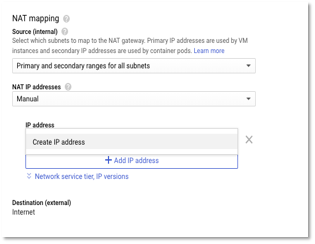
- In the NAT mapping, select Manual NAT IP address. We don’t select automatic as we would like to reserve a set of IPs that we can provide to external services/partners to whitelist on their servers. Choosing automatic would create and release IP based on workloads.
Figure 10 – Create NAT Mapping
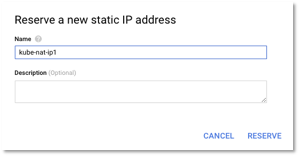
- Select Create IP address and enter the name of the IP address.
Figure 11 – Create Static IP address
- Similarly, create one more IP address. Two external outbound IPs are sufficient for our network. You can add new IPs based later, if you identify bottlenecks (through monitoring) in your network.
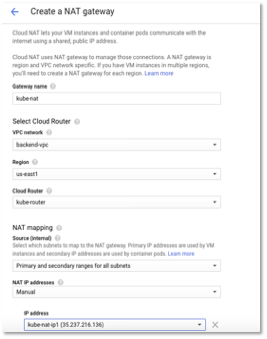
- The following image shows the summary of NAT configuration. Click create.
Figure 12 – NAT Gateway configuration
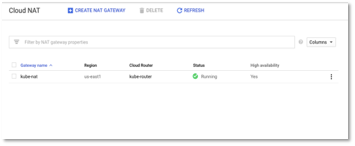
- Once created, wait until the status is Running for changes to be effective.
Figure 13 – Cloud NAT Status