In this article, we would deploy the endpoint configuration for our microservices application. As mentioned earlier, we are using Cloud Endpoints for API management to secure, monitor, analyze, and set quotas on our APIs.
Endpoints support version 2 of the OpenAPI Specification. For more details, refer to https://cloud.google.com/endpoints/docs/openapi/.
The OpenAPI configuration file of our microservice project is provided in script/kube-openapi-backend.yaml.
Open kube-openapi-backend.yaml and replace the host “apis.navveenbalani.dev” with the hostname where your API would be available. My APIs are available at apis.navveenbalani.dev. If you don’t have a host readily available, you can use <api-name>.endpoints.<YOUR-PROJECT-ID>.cloud.goog in host name, replace api-name with the name for your api and YOUR-PROJECT-ID with your google project id. You can later use the host name and map it to the IP address in your DNS settings and use the host name to invoke your service. For more details, refer to Configuring DNS for Endpoints section at https://cloud.google.com/endpoints/docs/openapi/get-started-kubernetes#configuring-endpoints-dns.
Next, we would deploy the endpoints for the application by following the steps below:
- Install Google Cloud SDK (if you haven’t already) from https://cloud.google.com/sdk/) on your local machine.
- With Google SDK installed, open a command prompt and set the project. Replace navveen-api with your project id.
> gcloud config set project navveen-api
- Go to scripts folder. Deploy the endpoint configuration by running the following command: –
> gcloud endpoints services deploy kube-openapi-backend.yaml
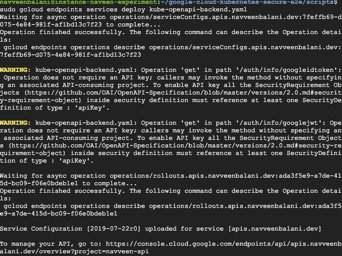
You should see similar messages being printed on the console and a URL being provided at the end to manage your APIs.
Figure 17 – Output of endpoint deployment
- Next, create an API key to access the Endpoint. Go to https://console.cloud.google.com/apis/credentials and select your GCP project.
- Click Create credentials, and then select API key,
- Copy the key to the clipboard. We will use the API key later when calling our endpoint.
- You can further apply restrictions on the API key (like HTTP Referrer, IP address, devices etc.) on who can invoke your endpoint based on your application needs. For instance, if you want to ensure your application can be invoked by specific IP addresses only, you can specify the list of IP addresses by clicking on the IP address option.
Create Workload, Service and Ingress
In this section, we would create the workload, service, and Ingress for our application. Go to the scripts folder of google-cloud-kubernetes-secure-e2e/scripts project and run the following commands in google cloud sdk/shell.
- Set the project. Replace Navveen-api by your project id.
> gcloud config set project navveen-api
- Connect to backend-custer
> gcloud container clusters get-credentials backend-cluster –zone us-east1-b
The backend-cluster is the kubernetes cluster and zone is us-east1-b where our cluster is running.
- Deploying the workload (backend)
- The kube-backend-deployment-gcp.yaml deploys our microservices container (kube-e2e-service) and kube-esp (google endpoint runtime container) as shown below.
containers:
      - name: kube-e2e-service
        image: gcr.io/navveen-api/kube-e2e-solution:v1
        ports:
          - containerPort: 8080
      - name: kube-esp
        image: gcr.io/endpoints-release/endpoints-runtime:1
        args: [
          "--http_port", "8081",
          "--backend", "127.0.0.1:8080",
          "--service", "apis.navveenbalani.dev",
          "--rollout_strategy", "managed",
        ]
        readinessProbe:
         httpGet:
          path: /healthz?key=AIzaSyC0m7d4cc-
          jOwJIzymv9ntObF1ukIMrTc-
          port: 8081
         initialDelaySeconds: 60
        livenessProbe:
         httpGet:
          path: /healthz?key=AIzaSyC0m7d4cc-
          jOwJIzymv9ntObF1ukIMrTc-
          port: 8081
         initialDelaySeconds: 60
        ports:
          - containerPort: 8081
All incoming requests would first be intercepted by the google endpoint container (kube-esp) which would will direct them to the microservices container (kube-e2e-service). The google endpoint container checks the API key and any rule that you have applied on the API key (quotas, IP address restriction, device restrictions etc.) and then forwards the request to respective endpoints in the microservices container.
- Open the kube-backend-deployment-gcp.yaml and replace “apis.navveenbalani.dev” with the hostname you provided in Step 7 while configuring the endpoint. The service name determines which endpoint configuration should be called.
- Replace AIzaSyC0m7d4cc-jOwJIzymv9ntObF1ukIMrTc- with the endpoint API key that you generated in earlier step.
- The readinessProbe and livenessProbe defines the health check URL for our service. Once the container is started, the path mentioned in the URL would be invoked, and if the response is 200, the container would be in ready state and should start serving requests. Note, this would test the endpoint configuration, as well as the actual microservice endpoint. We had discussed health check URLs in Step 4 earlier, and through this configuration, we decide which service to invoke for a health check.
- Deploy the workload by running the following command.
> kubectl apply -f kube-backend-deployment-gcp.yaml
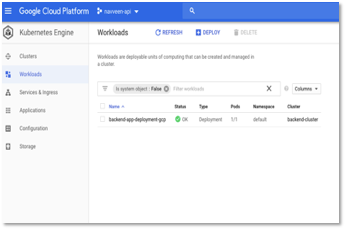
- Navigate to Kubernetes Engine -> Workload and you should see the status as green in a few minutes as shown below once the heath check is done.
Figure 18 – Status of workloads
- Deploying the service
- The kube-backend-service-node-gcp.yaml exposes the service on each Node IP at a static port (using NodePort type). The port:8081 is the static port and targetPort:8081 is the port where the request needs to be sent, which is the kube-esp container that we discussed earlier.
spec:
  type: NodePort
  selector:
    apps: backend-gcp
  ports:
  - port: 8081
targetPort: 8081- Create the service by running the following command.
> kubectl apply -f kube-backend-service-node-gcp.yaml
- Creating Ingress
In Kubernetes, an Ingress is a resource that allows access to your services from outside the Kubernetes cluster. Ingress resource consists of two components – a set of rules and an Ingress Controller.
The set of rules allows inbound connections to be directed to specific services in Kubernetes. An Ingress controller, which is typically configured as an HTTP Load Balancer implements the rules and direct connections to the respective services.
Follow the steps below to create Ingress for our application.
- First, we would create a static IP for Http Load balancer. Go to VPC Network – External IP addresses -> Reserve Static Address. Enter a name for IP (copy it, as we will use this later) and select type as Global. LoadBalancer works only with Global Type.
Figure 20 – Create Static IP address
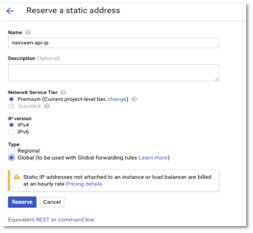
- Click Reserve and note the IP address. This is our external IP address where the service would be exposed. I have mapped this IP to my host api.navveenbalani.dev (in DNS). You can map this IP to your host name where apis would be available.
- Our services would be exposed over HTTPS (i.e. for my configuration it’s as https://api.naveenbalani.dev).
Next, we would create the SSL secret configuration, which consists of certificate and key for your domain. This assumes that you already have the SSL certificates, otherwise you can generate one using third party SSL provides like letsencrypt. Run the following command
kubectl create secret tls kube-api-ssl-secret \ –cert /Users/naveenbalani/Downloads/api-naveenbalani-dev-ssl/certificate-merged.crt –key /Users/naveenbalani/Downloads/api-naveenbalani-dev-ssl/private.key
Where /Users/naveenbalani/Downloads/api-naveenbalani-dev-ssl/certificate-merged.crt is path to the certificate and /Users/naveenbalani/Downloads/api-naveenbalani-dev-ssl/private.key is the path to the private key
- Next, we will deploy the Ingress. Ingress configuration is provided in the kube-backend-ingress-ssl-gcp.yaml file. Open the file and replace “navveen-api-ip” with the static IP address name that we created in earlier step. Also replace apis.navveenbalani.dev with your host name. We also reference the SSL secret “kube-api-ssl-secret” that we created earlier for the host apis.navveenbalani.dev. We also define a rule, that all request to apis.navveenbalani.dev would be directed to kube-node-service-gcp (i.e. NodePort) that we created in Deploying the service section earlier.
kind: Ingress
metadata:
  name: kube-ingress-gcp
  annotations:
     kubernetes.io/ingress.allow-http: "true"
     kubernetes.io/ingress.global-static-ip-name: navveen-api-ip
spec:
  tls:
  - hosts:
    - apis.navveenbalani.dev
    secretName: kube-api-ssl-secret
  rules:
  - host: apis.navveenbalani.dev
    http:
      paths:
      - backend:
            serviceName: kube-node-service-gcp
            servicePort: 8081
- Run the following command to create Ingress.
> kubectl apply -f kube-backend-ingress-ssl-gcp.yaml
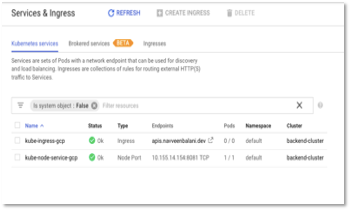
- Go to Kubernetes Engine – > Services and Ingress in Google cloud console and inspect the Ingress configuration. You should see the status of “kube-ingress-gcp” green in some time.
Figure 22 – Status of Services & Ingress
- Click on kube-ingress gcp. Click on the backend services and select the backend service where service port is 8081.
Figure 23 – Ingress Detail
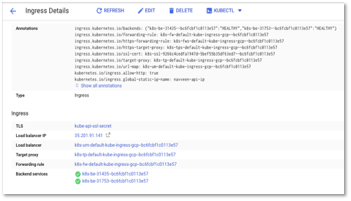
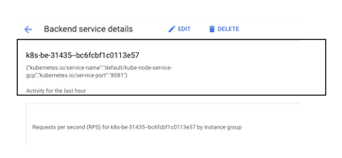
Figure 24 – Ingress Detail -> Backend: Port 8081
- Next, click on the Health check link and on the Heath check page you, should see the path (i.e look for Path variable) that we have specified in the workload deployment file being used for the health check.
Figure 25 – Ingress Backend Service – > Heath Check
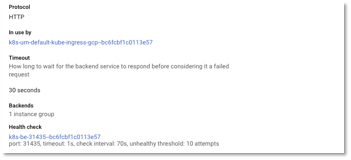
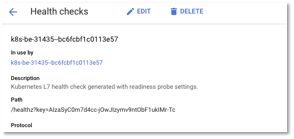
Figure 26 – Ingress Backend Service – > Heath Check -> Path
With this, we have setup the Ingress. Next, we would invoke our micro service.

