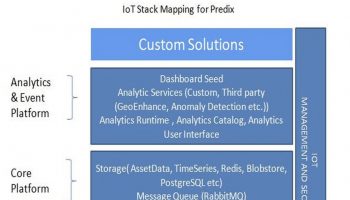
This article is part of IoT Architecture Series – https://navveenbalani.dev/index.php/articles/internet-of-things-architecture-components-and-stack-view/
The strategy for building the IoT application on AWS is pretty much the same as discussed earlier for IBM and Microsoft IoT offerings. You build IoT applications by composing the relevant AWS services and AWS IoT services. For instance, you could replace the Microsoft Azure services with services being offered by AWS for the connected car solution that we went through earlier. At the end of this article, we have provided a comparison chart of services offered by various IoT cloud platforms.
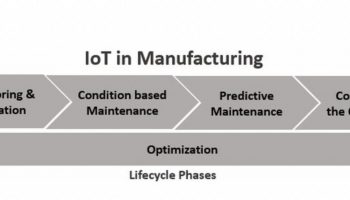
To summarize for the connected car solution, we went through three phases of implementation – real-time flow, offline/batch phase where we developed machine learning models and finally the third phase where we modified our real-time flow to integrate the machine learning model. We would not go over the entire steps in detail but summarize the integration below. Kindly refer to Microsoft IoT implementation article for details on how we arrived at the final (the third) step of the solution.
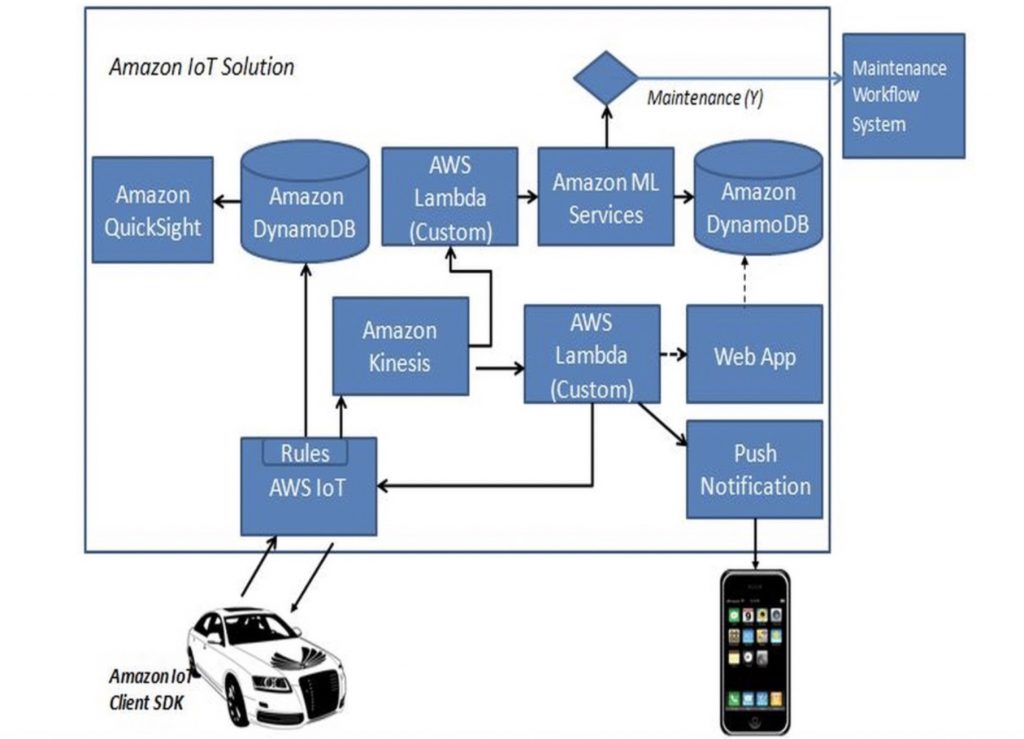
Given below is the final step of the connected car solution using Amazon IoT.
Hardware and Connectivity
For connecting the hardware device to the Amazon IoT platform, we use AWS IoT Device SDKs. We use MQTT protocol over TLS for secure communication. We went through the details earlier in Device Security, Authorization and Authentication section. We need to register the device in the registry, create certificates, assign policies and use the relevant SDKs. The following are the high-level steps
- Create Thing in Device Registry
- Create Certificates and Policies for secured communication
- Attach Certificate to Thing
- Generate SDKs
For the above steps, you can use AWS IoT Web console or AWS CLI (command line interface) commands. As part of device provision step, manufacturers would typically use AWS CLI as that would provide an ability to automate the process and use their own private key to generate certificates using AWS command.
We use the web console and list down the AWS CLI specific commands for reference.
- Create a new Thing by selecting the Create Thing button from the Create panel view. Give some logical name to your thing, which closely resembles your device. You will associate an actual device to this Thing later. Thing represents a virtual device, and you can perform any operations on it, similar to an actual device. We really liked this feature as it helped us to create an end application without even integrating a physical device.
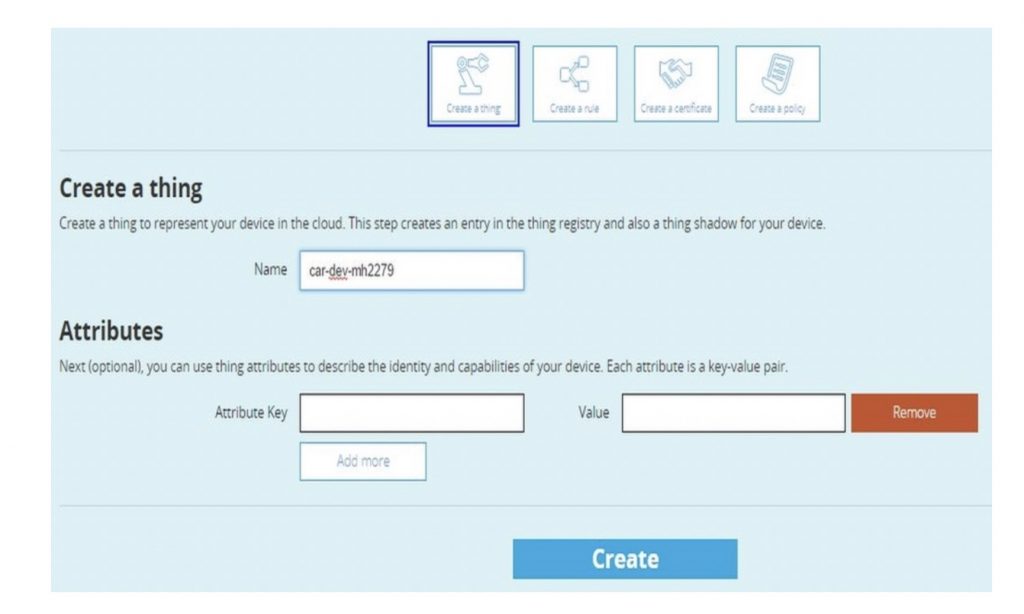
The AWS CLI command for creating a Thing is:
>>aws iot create-thing —thing-name “ccar-dev-mh2279”
Please note you need to have the right policies to invoke the create thing command. By default, root user has all the rights. If you create a new user, make sure he has the right policies to execute various AWS IoT commands. Attach is a sample policy document which allows most of the administrative IoT commands and can be used to create a new policy. Once the policy is created, you can assign it to the required users through IAM console.
{
"Version":"2012-10-17",
"Statement":[
{
"Effect":"Allow",
"Action":[
"iot:CreateKeysAndCertificate",
"iot:DescribeCertificate",
"iot:AttachPrincipalPolicy",
"iot:CreateThing",
"iot:list-things",
"iot:CreatePolicy",
"iot:AttachThingPrincipal",
"iot:DescribeEndpoint"
],
"Resource":"*"
}
]
}
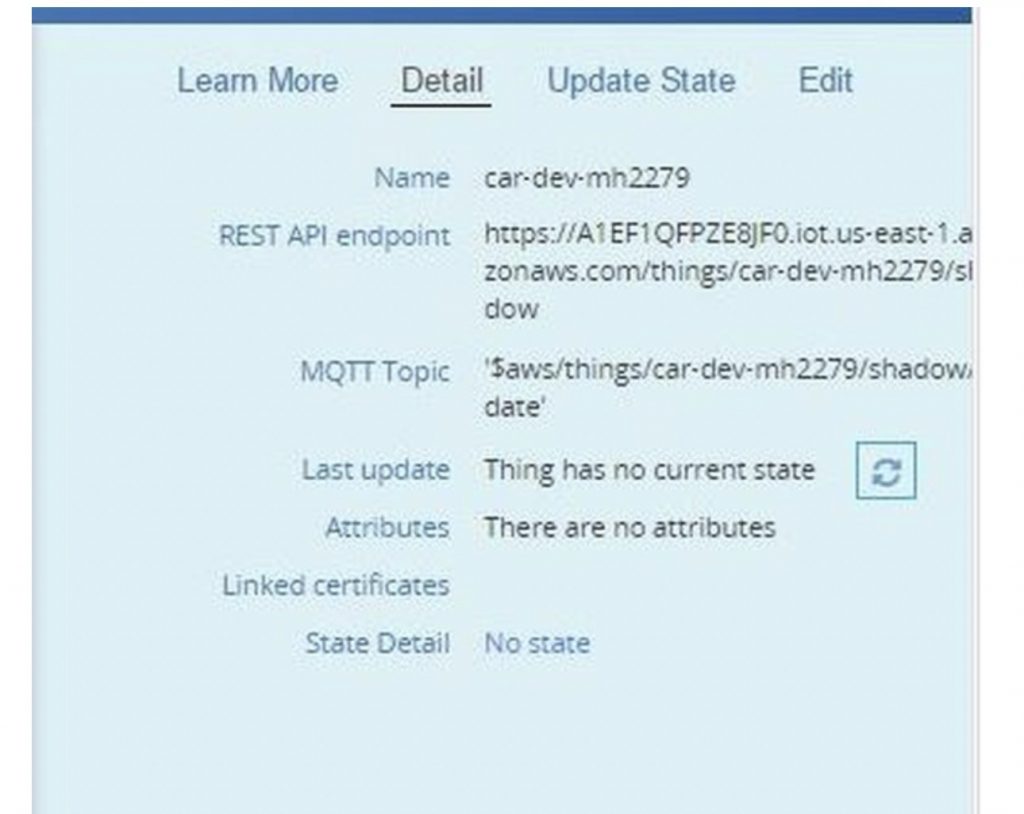
- On the next screen, you can click on View Thing option to view the details about the Thing as shown below.

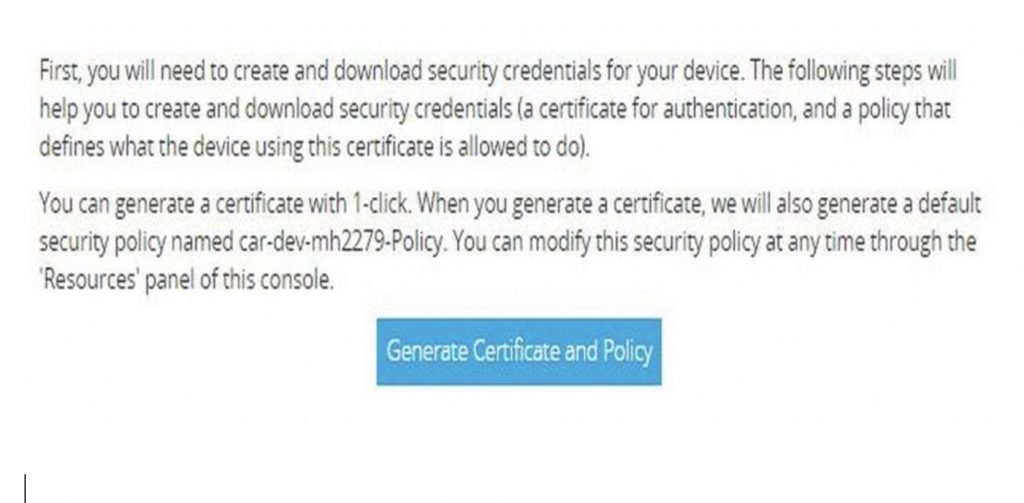
- Next, we need to create certificates and policies. One option is to select the Create a Certificate and Create a Policy from create panel view. The other option is to quickly generate all the steps using the Connect a Device option. This would generate certificates, policies, attach the policy to certificates, attach the certificate to Thing and also provide secret key and public key. Click on “Connect a Device” in the Detail view of Thing.
- Select an SDK based on the programming model supported by your device. We choose Node.js as we can test the integration easily from any available environment’s (laptops, phones, etc.) which supports Node.js runtime. Click on Generate Certificate and Policy
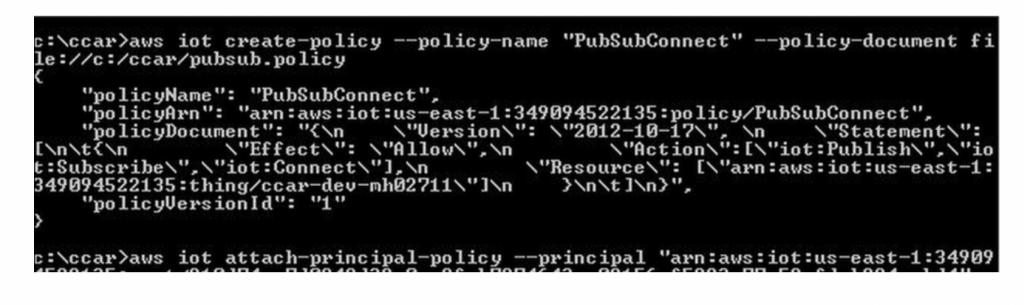
If you are using AWS CLI command, you need to use the AWS IoT create-keys-and-certificate command for creating certificate and keys, AWS IoT create-policy command for creating policy and for attaching policy to certificate you need to use AWS IoT attach-principal-policy command. Following shows the snapshots of the commands.
- In the next screen, download the public key, private key and certificate. Click Confirm.
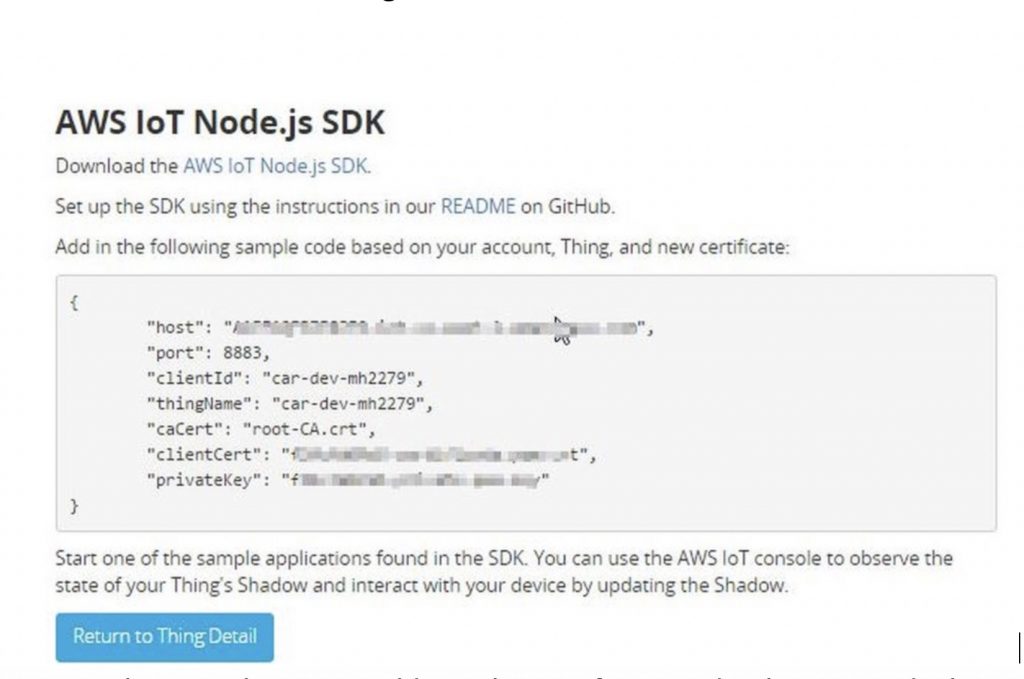
- In the AWS IoT Node.js SDK screen, copy the generated code values as we would need this for connecting our Thing to AWS IoT platform. Click on Return to Thing detail.
- In the console, you would see the certificate and policy created. The policy document name would be typically <thingname>-Policy. Click on it and you would see the policy document. The generated policy document grants all IoT operations to all resources, you can change this at runtime, by allowing only specific operations like publish or subscribe. This provides an ability to revoke or grant access to devices connecting the IoT platform without even touching the device.
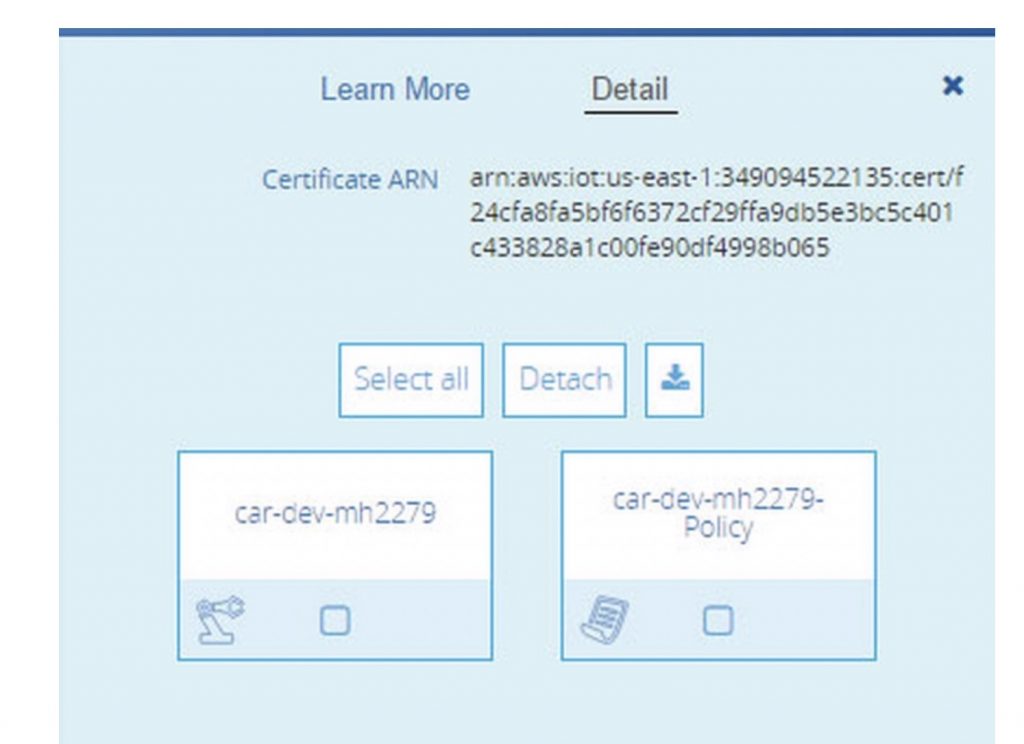
- Now click on the certificate (which would have the longest name) and you would see the certificate attached to the Thing and to the policy document that was created. This completes one configuration. We would now communicate with the IoT platform with the generated artifacts.
We would use Node.js for testing the secure connectivity with the IoT platform and send/receive messages. The following steps assume that you have Node.js runtime installed.
- Install the Amazon IoT Device SDK by the following command
npm install aws-iot-device-sdk
- Once installed, create a Node.js sample which would use the installed aws-iot-device-sdk module. There are a lot of samples provided in the examples directory of AWS IoT device SDK installation. Given below is sample Node.js file for testing. Save it as CCARTest.js. Replace host, clientId, thingName, caPath, cerPath, keyPath, and region value below based on your environment value. You would have received the value for your environment after the certificate was generated. For caPath certificate, download the root CA certificate which acts as a trusted source from Verisign for this location – https://www.symantec.com/content/en/us/enterprise/verisign/roots/VeriSign-Class%203-Public-Primary-Certification-Authority-G5.pem and save as root-CA.cert
var awsIot = require('aws-iot-device-sdk');

var device = awsIot.device({
    host:"xx.iot.us-east-1.amazonaws.com",
    port:8883,
    clientId:"car-dev-mh2279",
    thingName:"car-dev-mh2279",
    caPath:"root-CA.crt",
    certPath:"f42cec7751-certificate.pem.crt",
    keyPath:"f42cec7751-private.pem.key",
    region:"us-east-1"
});

device
.on('connect',function(){
    console.log('connect');
//subscribe..
    device.subscribe('topic/ccar');
//publish..
    device.publish('topic/ccar', JSON.stringify({ speed:80}));
});

device
.on('message',function(topic, payload){
    console.log('message received - ', topic, payload.toString());
});

device
.on('error',function(error){
    console.log('error', error);
});
The above code imports the ‘aws-iot-device-sdk’ module, creates a device configuration by passing in the required parameters – certificates, private key and other parameters values as shown above. The configuration is used to create a secure connection over TLS to the Amazon IoT platform. As you recollect, we had attached the certificate to our Thing and policy in Amazon IoT. Based on the thingName, the Amazon IoT retrieves the certificates and authenticates using private and public key combination and once authenticated, it authorizes operations based on the policy document attached to the certificate. Once the device is connected, the connect call back method in our code is invoked. For testing, our code acts as a publisher as well as the subscriber. In the connect method, we first subscribe to the topic named ‘topic/ccar’ and then publish a sample JSON request to ‘topic/ccar’. In a real world, the JSON data would be an actual vehicle data from the connected car. The call back method is invoked whenever a message is received on the topic – topic/ccar. Our code simply displays the value in the console.
- Next, run the above CCARTest.js file using the command node CCARTest.js. You would see the following output as shown below.
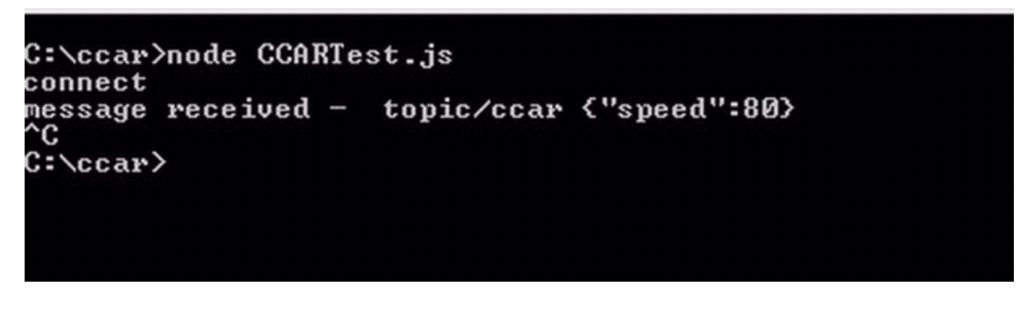
We are done connecting a virtual device to Amazon IoT platform securely and even tested out sending and receiving a message from Amazon IoT platform. Once the message reaches the Amazon IoT platform, we next look at how to build applications by composing the various AWS services.
Software Implementation Overview
The first step is to understand how you want to process the incoming data based on your requirements and what AWS services you would use to build your IoT applications. You then create rules using the rules engine that would route incoming data to one or multiple AWS services to process the data.
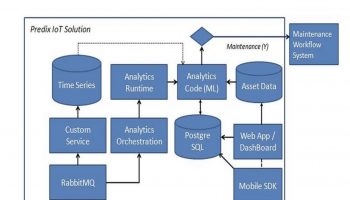
For our connected car application, we create two rules; one rule routes the message to a Kinesis Stream instance and the other rule directly inserts the incoming data to Amazon DynamoDB tables. We discussed the rule configuration in Storage section earlier.
For real-time dashboards and visualization, we plan to use Amazon QuickSight. Amazon QuickSight is currently under preview and integration looks promising. Amazon QuickSight integrates seamlessly with DynamoDB and other AWS services, so it would be easier to pull the relevant schema and build visualizations quickly. We would update this section with latest updates once we get access to QuickSight. If you are planning to build your own reporting, we suggest you to hold on and try out the QuickSight once available. This looks similar to PowerBI from Microsoft, which we had discussed earlier.
Before we talk about Kinesis stream instance, we will look at how Machine Learning models are developed using Amazon ML for the connected car use case. The approach and step required to build predictive models are exactly the same as mentioned in Building the Machine Learning Model section as part of the Microsoft IoT Stack. Instead of using Azure ML we use Amazon ML, and we choose to build machine learning models iteratively using offline process. Amazon ML as discussed earlier provides interactive visual tools to create, evaluate, and deploy machine learning models. Amazon ML provides an implementation of common data transformations, which is extremely helpful to prepare the data. As part of the prepare data phase, you load the data. Our raw data from the connected car is stored in Amazon DynamoDB. Currently, AWS ML tool does not support directly importing the data from Amazon DynamoDB. It currently supports Amazon Redshift, Amazon S3 and Amazon RDS (MYSQL only) only. So you need to make the data available in S3 via CSV format or import the data into Redshift. For the connected car use case, we develop two machine learning models (as discussed earlier) – regression model for predictive maintenance and multi-class classification for driver behavior analysis.
Once the Amazon ML is developed, it can be consumed through the Amazon ML API. The AWS ML APIs is available at http://docs.aws.amazon.com/machine-learning/latest/APIReference/API_Predict.html. The integration diagram described earlier in the Implementation Overview section shows how predictive maintenance is included in the final step. The integration of driver behavior analysis is pretty much the same and in this case, the output goes to mobile and the web instead of a maintenance request.
Coming back to Kinesis stream instance, we use it for processing the continuous flow of data from devices in real-time. Multiple applications can receive the streams of data and work in parallel. For the connected car use case, we emit the data from the Amazon Kinesis stream instance to 2 AWS Lambda components. One AWS Lambda component invoked the machine learning models using the APIs and based on the outcome (if maintenance is required), invokes the external maintenance system through a secured REST call for repairing of the equipment.
The second AWS Lambda component executes the rule conditions (i.e. driving speed > 100 km/hour, geo-fencing conditions). If the conditions are met, a notification is sent to the registered mobile via the push notification service. This completes one end to end integration flow.
The Kinesis stream instance acts as the data stream processing backbone, allowing new integration logic to be added to existing flow by simply integrating with Kinesis stream instance. We talked about many use cases in earlier articles for the connected car, like driver assistance, recommendations based on driving patterns, usage-based insurance, etc. and each can be realized using separate AWS Lambda components or AWS services.
