Create Workload, Service and Ingress
Go to the scripts folder of google-cloud-kubernetes-secure-e2e/scripts project and run the following commands in google cloud sdk/shell.
Set the project. Replace navveen-api by your project id.
> gcloud config set project navveen-api
- Connect to the backend-custer
> gcloud container clusters get-credentials backend-cluster –zone us-east1-b
The backend-cluster is the kubernetes cluster and the zone is us-east1-b where our cluster is running.
Deploying the workload
- The kube-backend-deployment-nginx.yaml deploys our microservices container (kube-e2e-service) and kube-esp (google endpoint runtime container). This file is the same as the kube-backend-deployment-gcp.yaml that we had described earlier in Solution 1, except that the name of deployment is backend-app-deployment-nginx (instead of backend-app-deployment-gcp).
- Open the kube-backend-deployment-nginx.yaml and replace “apis.navveenbalani.dev” with the hostname you provided in Step 7 while configuring the endpoint. The service name determines which endpoint configuration should be called.
- Replace AIzaSyC0m7d4cc-jOwJIzymv9ntObF1ukIMrTc- with the endpoint API key that you generated in the earlier step.
- The readinessProbe and livenessProbe defines the health check URL for our service. Once the container is started, the path mentioned in the URL would be invoked, and if the response is 200, the container would be in the ready state and start serving requests. Note, this would test the endpoint configuration as well as the actual microservice endpoint. We had discussed the health check URL in Step 4 earlier, and through this configuration, we provide which service to invoke for a health check. If you omit the health check configuration for nginx ingress, it would still work as the default backend service (i.e. nginx-ingress-default-backend service) that we discussed earlier provides a health check service which returns 200.
- Deploy the workload by running the following command.
> kubectl apply -f kube-backend-deployment-nginx.yaml
- Navigate to Kubernetes Engine -> Workload and you should see the status as green for backend-app-deployment-nginx in few minutes.
- Deploying the service
- The kube-backend-service-node-nginx.yaml exposes the service on each Node IP at a static port (using NodePort type). The port:8081 is the static port and targetPort:8081 is the port where requests need to be sent, which is the kube-esp container that we discussed earlier.
spec:
  type: NodePort
  selector:
    apps: backend-nginx
  ports:
  - port: 8081
targetPort: 8081- Create the service by running the following command.
> kubectl apply -f kube-backend-service-node-nginx.yaml
Creating Ingress
Follow the steps below to create Ingress for our application.
- The Ingress configuration is provided in kube-backend-ingress-nginx.yaml file. This file is similar to kube-backend ingress-ssl-gcp.yaml that we had discussed in Solution 1 earlier. We have added an annotation “kubernetes.io/ingress.class: nginx” to denote we want to use Nginx Ingress instead of GCE.
apiVersion: extensions/v1beta1
kind: Ingress
metadata:
  name: kube-ingress-nginx
  annotations:
    kubernetes.io/ingress.class: nginx
    nginx.ingress.kubernetes.io/ssl-redirect: "false"
spec:
  rules:
  - http:
      paths:
      - backend:
            serviceName: kube-node-service-nginx
            servicePort: 8081
The rules specify that any incoming http request would be directed to kube-node-service-nginx service. The kube-node-service-nginx service would direct it to the endpoint runtime, which would further forward it to the actual microservice implementation.
- Run the following command to create Ingress.
> kubectl apply -f kube-backend-ingress-nginx.yaml
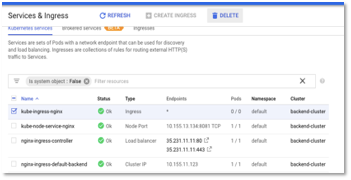
- Go to Kubernetes Engine – > Services and Ingress in Google cloud console and inspect the Ingress configuration. You should see the status of “kube-ngress-nginx” as green in some time.
Figure 40: Service & Ingress Status in Cloud Console
- Test the microservice by invoking the URL and you should see a response “ok” being printed on the console.
> curl -i http://35.231.11.11:80/fetchWebsite?key=AIzaSyC0m7d4cc-jOwJIzymv9ntObF1ukIMr-Tc
- Next, we would modify our ingress file to whitelist IPs. We add the below annotation with source range as 0.0.0.0/0 to allow IPs.
nginx.ingress.kubernetes.io/whitelist-source-range: “0.0.0.0/0”
We have created a new file “kube-backend-ingress-whitelist-all-nginx.yaml” which contains the added annotation.
apiVersion: extensions/v1beta1
kind: Ingress
metadata:
  name: kube-ingress-nginx
  annotations:
    kubernetes.io/ingress.class: nginx
    nginx.ingress.kubernetes.io/ssl-redirect: "false"
    nginx.ingress.kubernetes.io/whitelist-source-range: "0.0.0.0/0"
spec:
  rules:
  - http:
      paths:
      - backend:
            serviceName: kube-node-service-nginx
            servicePort: 8081
- Before running the new configuration, delete the existing kube-ngress-nginx ingress (by selecting kube-ngress-nginx and clicking delete from the Services & Ingress page). Run the following command to create Ingress.
> kubectl apply -f kube-backend-ingress-whitelist-all-nginx.yaml
- Test the microservice again by invoking the URL and you should see a response “ok” being printed on the console. This tests out the whitelisting for our ingress.
> curl -i http://35.231.11.11:80/fetchWebsite?key=AIzaSyC0m7d4cc-jOwJIzymv9ntObF1ukIMr-Tc
- Next, we would modify our ingress file to whitelist a specific IP. We add the below annotation with source range as 35.194.8.213 to allow only request from IP address – 35.194.8.213 to access our service.
nginx.ingress.kubernetes.io/whitelist-source-range: “35.194.8.213”
We have created a new file “kube-backend-ingress-whitelist-nginx.yaml” which contains the added annotation.
apiVersion: extensions/v1beta1
kind: Ingress
metadata:
  name: kube-ingress-nginx
  annotations:
    kubernetes.io/ingress.class: nginx
    nginx.ingress.kubernetes.io/ssl-redirect: "false"
    nginx.ingress.kubernetes.io/whitelist-source-range: "35.194.8.213"
spec:
  rules:
  - http:
      paths:
      - backend:
            serviceName: kube-node-service-nginx
            servicePort: 8081
- Before running the new configuration, delete the existing kube-ngress-nginx ingress (by selecting it and clicking delete from the Services & Ingress page). Run the following command to create Ingress.
> kubectl apply -f kube-backend-ingress-whitelist-nginx.yaml
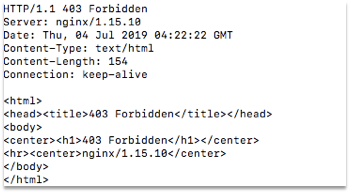
- Test the microservice again by invoking the URL and you should see a 403 Forbidden error being printed on the console. This tests out the whitelisting for our ingress.
> curl -i http://35.231.11.11:80/fetchWebsite?key=AIzaSyC0m7d4cc-jOwJIzymv9ntObF1ukIMr-Tc
Figure 41: 403 Forbidden Error
We don’t need to use Cloud Armor with Nginx Ingress as Nginx Ingress controller provides whitelisting and many features out of the box. This completes the production step. For list of best practices to follow for production setup, check out the last part of the series https://navveenbalani.dev/index.php/articles/building-production-topology-with-google-cloud-part-7/


