In this chapter, we would deploy Nginx Ingress Controller instead of GCE.
NGINX, by default, provides a lot of additional capabilities as compared to the default GKE Ingress controller like URL rewriting, whitelisting, load balancing over HTTPS and websocket and advanced features through Nginx Plus. For details, refer to https://www.nginx.com/products/nginx/.
It is assumed that you have executed Step 1 – 7 as per the previous article.
Install Nginx Ingress
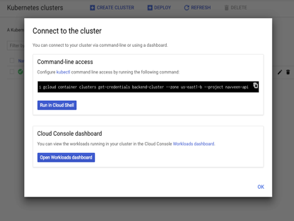
The first step is to install Nginx Ingress in our cluster. Navigate to Cloud Console – > Kubernetes Engine -> Cluster. Click on the connect button for backend-cluster. This will launch the cloud shell as shown below. Click ok to Run in cloud shell to connect to the backend-cluster.
Figure 35: Cloud Shell
Next, we will install Helm which allows us to install and manage Kubernetes applications and resources effectively. Helm has two parts: a client (helm) which runs on cloud shell and a server (tiller) which runs inside of the kubernetes cluster and manages the installation.
Install the latest version of Helm by running the following command:
> curl -o get_helm.sh https://raw.githubusercontent.com/kubernetes/helm/master/scripts/get
> chmod +x get_helm.sh
> ./get_helm.sh
Next, we would Install Tiller. Run the following commands to install the server-side tiller to the Kubernetes cluster. The below command creates a service account and the cluster-admin role to manage the cluster.
> kubectl create serviceaccount –namespace kube-system tiller
> kubectl create clusterrolebinding tiller-cluster-rule –clusterrole=cluster-admin –serviceaccount=kube-system:tiller
> helm init –service-account tiller
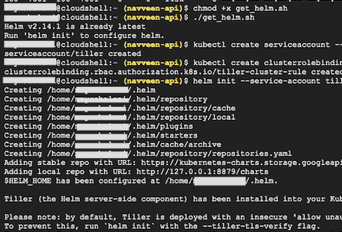
The following image shows the command interactions and output at the google cloud shell.
Figure 36: Cloud Shell -> Installation of Helm
Next, we will install the Nginx Ingress through Helm. Installing Nginx Ingress will configure a Service type of LoadBalancer in our cluster which will route all the incoming requests as per the rules you define in the deployment file (we will look at this later while deploying the ingress.yaml file).
LoadBalancer should listen over an IP. The IP can be automatically assigned by the network system or you can create a static IP address and use the ip address while installing Nginx. We will create a static IP address since this IP address can then be mapped to your domain name where you want to expose the service for public consumption (i.e. similar to domain like api.naveenbalani.dev that we went through in Solution 1). SSL certificate can also be installed on the domain, so you can receive HTTPS requests.
Create a static IP address of type Regional and select the region (select the same region as that of your VPN). Please note that Global Type would not work with Nginx Ingress LoadBalancer. Following image shows the configuration.
Figure 37: Create Static IP
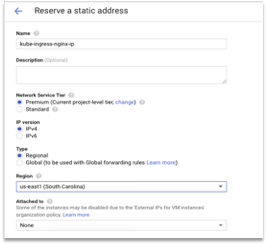
Create the IP and note the IP address.
Next, go back to cloud shell and install Nginx Ingress by running the following command. Replace 35.231.11.11 by the IP from the earlier step.
> helm install –name nginx-ingress stable/nginx-ingress \
–set controller.service.loadBalancerIP=35.231.11.11\
–set rbac.create=true \
–set controller.publishService.enabled=true
The above command would create a Nginx Ingress Controller of type HTTP Load Balancer at 35.231.11.11.
You can also enable SSL while installing Nginx Ingress. If you have an SSL certificate for your domain, you can enable SSL while installing Nginx ingress.
First, you need to create the secret based on your domain certificate and private key.
> kubectl create secret tls backend-api-ssl-secret \
–cert /Users/navveenbalani/<domain.com>/certificate.crt –key /Users/navveenbalani/<domain.com>/private.key
Next, you need to reference the backend-api-ssl-secret while installing Nginx Ingress. Use the following command to enable SSL during installation:
helm install –name nginx-ingress stable/nginx-ingress \
–set controller.service.loadBalancerIP=35.231.11.11\
–set rbac.create=true \
–set controller.publishService.enabled=true \
–set controller.extraArgs.default-ssl-
certificate=default/backend-ssl-secret
After running the command, you should get the following message on the console:
The nginx-ingress controller has been installed.
It may take a few minutes for the LoadBalancer IP to be available.
To see the status of the Nginx Ingress controller, run the following command:
> kubectl –namespace default get services -o wide -w nginx-ingress-controller
If you see an external IP (the one that we provided earlier), that implies the Nginx Controller is listening on the configured external IP.
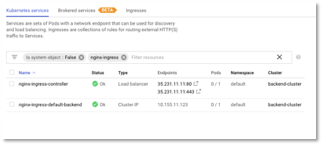
Figure 38: Nginx Ingress Status

If you navigate to Kubernetes Engine -> Service & Ingress, you will see nginx-ingress-controller listening on the ip address that we configured earlier as shown in the figure below. You would also see a service named “nginx-ingress-default-backend”. The nginx-ingress-default-backend service provides default backend which handles all URL paths and hosts the nginx controller doesn’t understand (i.e., all the requests that are not mapped with an Ingress). Basically, a default backend exposes two URLs: – /healthz that returns 200 and / that return 404. You can use the Nginx default backend service for the health check instead of providing your own heath check service implementation, that we discussed earlier in Solution 1.
Figure 39: Nginx Ingress Status in Cloud Console
With the Ingress controller setup, we would execute the deployment scripts.

