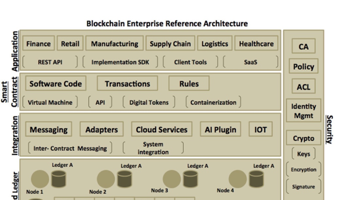
In this section, we would implement and deploy the smart contract for our use case.
The crowdsourcing contract is in ethereum/contract folder. Open the CrowdSourceContract.sol file. We will go over the important code snippets of our contract. Our contract is written in Solidity programming language. There are three main components to look at:
CrowdFunding – This is the contract class.
FundingProject – A custom type that hold project details as part of the contract.
Funder – A custom type that holds funder details as part of the contract.
Let’s walkthrough the code:
We first specify the Solidity version required to compile our contract.
pragma solidity ^0.4.11;
We then create the CrowdFunding contract using the contract keyword
contract CrowdFunding {
The CrowdFunding contract contains the FundingProject and Funder custom types with required attributes. We then create instances of the custom types.
//Funding project details
    struct FundingProject {

        string name;
        string email;
        string website;
        uint minimumfunds;
        uint amountraised;
        address owner;
        string status;

    }

    //Funder who funds project.
    struct Funder {
        string name;
        address fundedby;
        uint amount;
    }

//Multiple funders can fund project
    Funder[] public funders;

    //Instance
    FundingProject public fundingproject
Next, we define methods/operations that would be exposed by our contract.
The CrowdFunding() method shown below is the constructor of our contract which would initialize the project details. It expects parameters that are used to initialize the FundingProject type. We will show you how to pass these parameters once we instantiate the contract through our wallet interface in the next section.
function CrowdFunding (
        string _name,
        string _email,
        string _website,
        uint _minimumfunds,
        address _owner
        )
    {

 //convert to ether
uint minimumfunds = _minimumfunds * 1 ether;
uint amountraised = 0;
fundingproject =
FundingProject(_name,_email,_website,
minimumfunds,amountraised,_owner,
"Funding Started");

    }
Next, we initialize the Funder type and assign it to the funders array as part of the fundProject() method. The attribute amountraised of the FundingProject type will be updated to reflect the funder’s amount. It means the funder has provided funding of that amount value. If the attribute amountraised is greater than minimumfunds i.e. if the project meets the funding target then the amount is sent to the beneficiary account named ProjectAI. This is done using the send() method of the FundingProject.owner attribute. Following shows the code snippet –
fundingproject.owner.send(fundingproject.amountraised)
The important thing to note is that the amount reaches the ProjectAI account only when minimum funding amount is raised. Until that duration, the amount transferred from Funder’s account is put on hold by the contract.
The below fundProject() method uses the payable modifier to receive ethers from the application (i.e., from Funders account who is funding the project)
function fundProject( string name) public payable {

if (stringsEqual(fundingproject.status ,"Funding Completed")) revert();
	funders.push(Funder({
				name: name,
				fundedby: msg.sender,
				amount: msg.value
			   })
			);
	 fundingproject.amountraised =
                fundingproject.amountraised + msg.value ;

if (fundingproject.amountraised >=
               fundingproject.minimumfunds) {

              if(!fundingproject.owner.send(fundingproject.amountraised )) revert();
               fundingproject.status = "Funding Completed";
	}
	else {
                         fundingproject.status = "In Progress";
	}
}
Next, we define the stopFundRaising() method. The said method returns all the money to the respective Funders (if the funding target is not met) by iterating through the funders array and calling the send() method of Funder.fundedBy attribute for each funder object in the array. Following shows the code snippet –
funders[p].fundedby.send(funders[p].amount)
The stopFundRaising() method uses the payable modifier to send ethers from the contract to respective funders account.
function  stopFundRaising() public payable {
    	 if (stringsEqual(fundingproject.status ,"Funding Completed")) revert();
    	 fundingproject.status = "Funding Stopped";
    	 //return money to all funders
    	 for (uint p = 0; p < funders.length; p++) {
    	 	if(!funders[p].fundedby.send(funders[p].amount)) throw;
    	 }
    	 fundingproject.amountraised = 0;
    }
Next, we define the getProjectStatus() constant method, that displays the status of the project at any interval.
function getProjectStatus() public constant	returns(string) {
    		return (fundingproject.status);
}
We now have our CrowdFunding contract ready, the next step will be to deploy the same. You can copy the content of the CrowdSourceContract.sol file and navigate back to Ethereum Wallet application. Click on Contracts from the top menu. On contracts window, navigate to Deploy New Contract. Select Main Account as the From option.
Paste the copied content inside the Solidity Contract Source code window. The resulting contract will be converted to bytecode once it is successfully compiled. If there were an error in the contract, you would see a message “could not compile source code.”
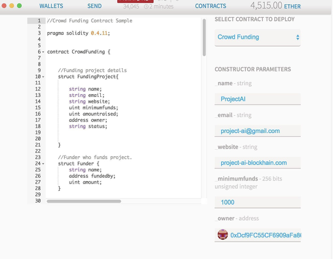
Once the contract is compiled successfully, select the contract Crowd Funding from Select Contract to Deploy dropbox as shown in the figure below and enter the following details:
- Enter name as ProjectAI
- Enter any email address and website
- For minimum funds, enter 1000. This is the minimum amount to be raised for this crowdfunding project.
- Enter the address of account ProjectAI (if you recall, we had copied and saved this earlier)
- Click Deploy
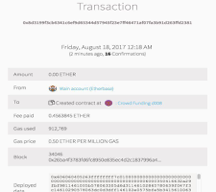
On the Create contract window, you would see the transaction fee and gas price for deploying the contract as shown in the figure below. Enter the password of the Main Account and click Send Transaction.
If you go to Wallets tab and scroll down to the Latest Transactions section, you would see “Crowdsourcing Contract” being committed. Once all the confirmations are done, click on the transaction entry. You would see the transaction details and public address of the contract in the To column as shown in the figure below.
Click on the Crowd Funding public address link, and you would see the contract details. You can verify the contract details entered earlier. You will also see the status of the project as Funding Started as shown in the figure below.
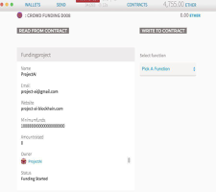
Now, in the Select function drop down, select Fund Project method and enter name as “Fund from Funder 1”. In the Execute from option select Funder 1 and specify 700 as ether amount as shown in the figure below.
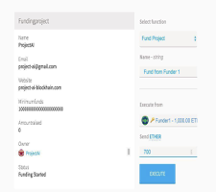
Click Execute. On the Execute Contract window, specify the password for Funder1 and click Send Transaction. You should see the amount raised as 700000000000000000000 and status of the project changed as “In progress.” The 700000000000000000000 value is in wei units (1 Ether = 1000000000000000000 wei), the Wallet displays currency in wei units. You can verify the transaction details in the Latest Transaction view, and you should also see 700 ethers and transaction fee deducted from the Funder1 balance.
Next, go back to the contract (either by clicking on contract link from the transaction view or by selecting Contracts from the top menu and clicking on the specific contract address from the custom contract list).
Now, select Fund Project method from Select function dropdown and this time, select Funder2 and transfer 350 ethers as shown below.
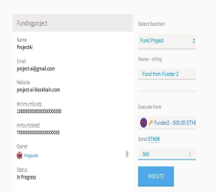
Click Execute and send the transaction. Once the transaction is committed, you will see the status of the project changed to Funding Completed. You should also see 350 ethers and transaction fee deducted from the Funder2 balance. The ProjectAI account would be credited with 1050 ether amount.

Next, we would execute the Stop Funding use case, where the amount funded by Funders would be transferred back to the Funders wallet if the funding target is not met.
For this use case, we would follow similar steps as described earlier with the addition of executing the Stop Funding function. Let’s call this as Use Case 2 (we would reference this later). To implement ‘Stop Funding’ use case, carry out the following steps :
- Create a new contract as per earlier guidelines and copy the content of CrowdFunding.sol in the new contract
- Select Crowd Funding contract and provide the necessary details. Provide minimum funds as 500 and execute the contract.
- Verify the project status as ‘Funding Started’.
- Select the Fund Project method and transfer 200 ethers from Funder1 account. Execute the transaction.
- Verify the minimum funding amount value is 200 for this project after the transaction is executed.
- Now, execute the Stop Fund Raising method, select the execute from as Main Account (or Funder1 Account). Click Execute.
- The status of the project would be Funding Stopped, and you will see the 200 Ether transferred back to Funder1 Account. You can verify the balance of the Funder1 Account.
In the next article, we will look at how to invoke the smart contract from a web application