In this section, we will build a crowdsourcing application using an Ethereum platform. Our crowdsourcing application has the following requirements;
- Register a project that needs funding. The minimum funding amount for a project can’t be changed after the initial setup.
- Multiple funders should be able to fund the project.
- View the status of the funding at any interval.
- Update the status of project as it goes through the process of funding.
- Funding of the project can be closed explicitly. If the funding is closed explicitly, the funders should get their respective amount automatically.
We will create a smart contract that will implement the above use case requirement. To realize our use case, we will create a local private instance of Ethereum, where all functions of the use case will be executed locally.
Setting Ethereum on Local Environment
To set up an Ethereum network on a local environment, you will need to download one of its implementation. We would go with Go Ethereum.
Go Ethereum is an implementation of Ethereum in Go programming language. To get started, download Go Ethereum a.k.a. Geth for your operating system from https://geth.ethereum.org/downloads/. The current version of Geth at the time of writing this book is 1.7.1.
Tip – If you are on a MAC, use the following details to quickly install Ethereum using brew.
$ brew tap ethereum/ethereum
$ brew install ethereum
To bootstrap your private Ethereum network, we need to create a starting block or the first block termed as genesis block. A genesis block is the block that contains configuration details of the Ethereum network. The following JSON file is a sample custom genesis configuration that you will use to bootstrap the Ethereum private network.
{
  "config": {
        "chainId": 1,
        "homesteadBlock": 0,
        "eip155Block": 0,
        "eip158Block": 0
    },
  "alloc"      : {},
  "coinbase"   : "0x0000000000000000000000000000000000000000",
  "difficulty" : "0x20000",
  "extraData"  : "",
  "gasLimit"   : "0x2fefd8",
  "nonce"      : "0x0000000000000050",
  "mixhash"    : "0x0000000000000000000000000000000000000000000000000000000000000000",
  "parentHash" : "0x0000000000000000000000000000000000000000000000000000000000000000",
  "timestamp"  : "0x00"
}
The above configuration file named start.json specifies the fields in JSON format that sets up the Ethereum network. Some of the significant fields are difficulty level, gas limit, nonce, mixhash hash values (used for applying PoW), starting block number (i.e., chainId) and so on. You can also bootstrap the network with predefined wallet accounts and ether by specifying it in the alloc field. We will leave the alloc field blank for now, as we will focus on creating accounts and mining ethers locally as part of our application.
In the next section we will create the above genesis block and set up a local Ethereum network. To get started, download the project from the GitHub repository – https://github.com/enterprise-blockchain-book/first-edition.git.
Note – For more details on genesis block, refer to https://github.com/ethereum/go-ethereum/wiki/Private-network
Creating Genesis Block
As a first step, we will bootstrap a local Ethereum network by creating the genesis block using the above described start.json file. You can follow the below steps:
- Open a terminal or command prompt and navigate to ethereum/setup folder from the downloaded git project. Run the following command:
geth –datadir=./data init start.json
It will create the genesis block in the data folder. You should see a message at the end –“Successfully wrote genesis state”
- Next execute the following command to start a local instance of Ethereum using the data folder created in earlier step.
geth –networkid 999 –ipcpath ~/Library/Ethereum/geth.ipc –rpc –rpcaddr “127.0.0.1” –rpcapi=”db,eth,net,web3,personal,web3″ –rpcport “8545” –datadir=./data –rpccorsdomain “*” console
Note – For windows, use the same command without the ipcpath. –
geth –networkid 999 –rpc –rpcaddr “127.0.0.1” –rpcapi=”db,eth,net,web3,personal,web3″ –rpcport “8545” –datadir=./data –rpccorsdomain “*” console
The following provides the details of the above command line options:
- networkid – The
networkid value of 999 signifies a local environment. There are standard
predefined networkid values from 1 to 5, like 1 for Frontier which connects to
an actual Etherum network, 3 is for Ropsten which is a Test Ethereum
network. Any value other than these
predefined values implies a local instance.
- ipcpath – This is the IPC endpoint file. IPC or interprocess communication allows local processes to communicate with geth using the IPC endpoint.
- rpc – Enable remote procedure call of Geth APIs over HTTP JSON-RPC protocol.
- rpcaddr and rpcport – Specify RPC address and RPC port
- rpcapi – List of Geth APIs that would be enabled over RPC port
- datadir – The data directory for the databases.
- rpccorsdomain – Comma-separated list of domains from which to accept cross-origin requests from the browser. A value of “*” implies accept a request from all domains. Our web application will use XMLHttpRequest to interact with Ethereum node using RPC protocol.
- o console – This would start the geth node instance and open the console.
Note – To view all command line options, kindly visit https://github.com/ethereum/go-ethereum/wiki/Command-Line-Options.
After you execute the command, you would see the below set of messages being printed on the console, denoting IPC endpoint and RPC-HTTP location of the Ethereum node, along with the Geth JavaScript console welcome message. Let’s refer to the said console as ‘geth console’, and we would reference this later in this chapter. You can also see some modules loaded at the end. We will use one of the module web3 API to invoke certain useful functions.
“INFO [08-15|17:55:27] IPC endpoint opened: /Users/Navveen/Library/Ethereum/geth.ipc
INFO [08-15|17:55:27] HTTP endpoint opened: http://127.0.0.1:8545
Welcome to the Geth JavaScript console!
instance: Geth/v1.6.1-stable-021c3c28/darwin-amd64/go1.8.3 modules: admin:1.0 debug:1.0 eth:1.0 miner:1.0 net:1.0 personal:1.0 rpc:1.0 txpool:1.0 web3:1.0”
Creating Main Account
In this section, we would create our first account using geth console. Follow the steps below:
- On the geth console prompt, let’s create an account by invoking the web3 API personal.newAccount() method. You can replace ‘password’ by the password of your choice..
> web3.personal.newAccount(“password”)
You will see the following public address and keystore location of the account. The first account is designated as the main account (a.k.a. etherbase) by default. This is the default address where the mining reward (i.e., ether) would be credited.
“0x42d187a0fce3392e853770d360e850f2ea1681bc”
> INFO [08-15|18:00:47] New wallet appeared url=keystore:///Users/Navveen/Downlo… status=Locked
- You can view the list of accounts, by using the web3 API method personal.listAccounts() as shown below
> web3.personal.listAccounts
The above method will display the public address of the main account.
[“0x42d187a0fce3392e853770d360e850f2ea1681bc”]
- Next, you would get the balance associated with the main account as
> web3.fromWei(eth.getBalance(eth.coinbase));
0
The getBalance() method returns 0, which is as expected as we do yet have any ethers in the account.
Creating Miners
In this section, we would start mining locally to add ethers to the main account. Follow the steps below:
- Open a new terminal or command prompt and type in the following command to connect to existing Ethereum geth node instance over IPC port that we had set up earlier. We will provide the path to the existing IPC endpoint location to the ‘geth attach’ command. Upon running the command it will open up the console. Let’s refer to this console as ‘geth sub-console’; we would reference this later in the chapter.
geth attach ~/Library/Ethereum/geth.ipc
Note – For windows, use the same command without specifying the ipc path as shown below. If you recall earlier while starting the geth instance we did not specify ipc path for windows.
geth attach
You should see the following message –
instance: Geth/v1.6.1-stable-021c3c28/darwin-amd64/go1.8.3
coinbase: 0x42d187a0fce3392e853770d360e850f2ea1681bc
at block: 0 (Thu, 01 Jan 1970 05:30:00 IST)
datadir: /Users/Navveen/Downloads/ethereum/setup/data
modules: admin:1.0 debug:1.0 eth:1.0 miner:1.0 net:1.0 personal:1.0 rpc:1.0 txpool:1.0 web3:1.0
- On the prompt, enter the following command
> miner.start(2)
This will start mining on the geth console. On the geth console, you should see the messages “committed new block” being printed. The value of 2 signifies the number of threads. It means the command will spawn two threads to perform mining in parallel. You can specify any number of threads. Please note that threads are expensive resources and therefore specifying large number of threads will take up more system memory.
You can stop the mining after 30 minutes, and you should have enough ethers in the main account. To stop mining, execute the following command
> miner.stop()
- Go back to the geth console and type in the following to get the balance of the main account.
> web3.fromWei(eth.getBalance(eth.coinbase));
You would see ethers in your account. For the crowdfunding application, we would need around 2000 ethers. So, make sure you have enough ethers; else you can start the mining process again by issuing commands in geth sub-console as described earlier.
With the main account setup with enough ether balance, next we will create additional accounts using the Ethereum Wallet application. We will also deploy and execute our smart contract using the said application.
Installing Ethereum Wallet
Ethereum Wallet provides a graphical interface to create and manage accounts and execute smart contracts. You can download the Ethereum Wallet for your operating system from the Download section at https://github.com/ethereum/mist/releases
Next, open the Ethereum Wallet, and this should connect to your running local Ethereum instance. You should see a message – Private NET on the application window as shown below. It effectively means the wallet is connected to the running local instance. Click on Launch Application.

You should see an Account Overview screen as shown in the figure below. The Accounts section contains the Main Account (etherbase) that we created earlier, along with the ether balance that was mined locally.
Creating Accounts
Next, we would create sample accounts for our crowdsourcing application. We will create total of three accounts, two funder accounts and one beneficiary account for which the money is being raised.
Earlier we created the main account using the Web3 APIs; this option provides an alternate way to create accounts using the wallet interface.
For creating accounts, click on the Add Account link. Enter the password for the account and confirm it. Next screen would display the password key files for your account and its path. If you plan to use your account on other machines or phones, you can simply import this key files to get access to your account.
Note – A pair of keys, a private key, and a public address defines every account in Ethereum. If you lose the key file, you will lose access to your account. So make sure to backup this key file when running in a production environment. The key file is available in Ethereum node’s data directory. For Mac, this is located at ~/Library/Ethereum, for Linux – ~/.ethereum and for windows at C:\Users\%username%\%appdata%\Roaming\Ethereum.
The key file is a hidden file; so make sure you have enabled the appropriate option to view the hidden files.
Click on the newly created account. On the account details page, click on Account 2 and rename it as Funder1. The following figure shows the details of Funder1 account.
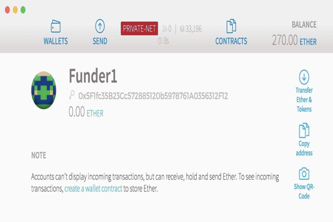
Now, click on the copy address link located on the right side. A warning window will be displayed as the account is on private network, click copy anyway.
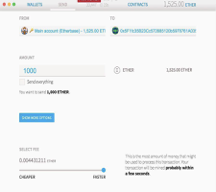
Next, click on Transfer Ether and Tokens. On the Send tab, select From as the Main Account (Etherbase), and the To field should be populated with the address of the Funder1 account. If not, paste the address that you copied in the earlier step. Enter amount as 1000. If you click on Show More Options, you can specify the fee you are willing to pay for executing this transaction in the blockchain network. You can also select a higher fee for faster processing of the transaction. Since this is a private network, drag the fee slider to Faster. The following figure shows the Send tab with these details. Click Send.
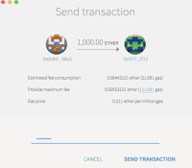
On the Send transaction window, specify the account password to confirm the transaction. In this page, you would see the gas price, the estimated consumption fee in ethers from earlier selected option and the maximum fee, which you are willing to pay for the transaction.
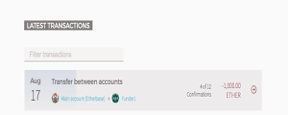
If you go to Wallets tab and scroll down to Latest Transactions section, you would see a transaction entry for the above record and confirmation block counts (0 of 12.). To invoke this transaction, the miner needs to be started, as they would execute the transaction and commit the block. Start the miner again in the geth sub-console using the command miner.start(2) as described earlier and you would see the confirmation block count progressively increasing as shown in the figure below.
Once the confirmation count reaches 12 of 12, the block would be added to the blockchain. If you click on it, you can view the transaction details and block number mined for this transaction.
Note – The number of confirmations is the number of new blocks (in a sequence) that is appended to a block of transaction. The 12 number implies, 12 new blocks were appended to the block that contains your transaction. Once the confirmation is reached, the transaction block is committed. The confirmation is required to ensure a secure block is being committed to the blockchain and avoid orphaned blocks. The orphaned block occurs when two miners produce blocks at the same time. However, some public Ethereum network might require many blocks for confirmation based on their use cases, which implies it might even take hour(s) for a single block to be committed. For more details, refer to this excellent article from Vitalik Buterin at https://blog.ethereum.org/2015/09/14/on-slow-and-fast-block-times/
Similarly, create another account called Funder2 and transfer 500 ethers from Main Account. For the beneficiary account, create an account and call it as ProjectAI. We will transfer the funds to ProjectAI account now using smart contract. Copy the address of ProjectAI account, as we would need this later once we deploy the contract. The following image shows the snapshot of all the accounts created so far along with its balance in ethers.
In the next article, we would create the smart contract,
