In this section, we would create a front-end web application that would execute our smart contract. As mentioned earlier, the DApp comprises of a frontend and a blackened code. We implemented the backend code for our crowdsourcing application using smart contract. Now, to interact with the smart contract and the blockchain network using a frontend application, we have a wide range of options. You can develop using the Web3.js JavaScript library or install a framework like Truffle that provides a development and testing environment for building DApp.
For our use case, we would use the Web3.js library to interact with our smart contract. We will execute the same steps we carried out in Use Case 2, but this time, we would call the Stop Fund Raising method of the contract through the user interface and check the status of the project once the block has been committed to our local blockchain network.
To get started, carry out steps 1 -5 as listed in Use Case 2 as a prerequisite. Next, navigate to ethereum/web folder of the downloaded source code location and open the home.html in any editor. Let’s look at some of the important code snippets.
In home.html, we first add web3.js library.
<script type=”text/javascript” src=”web3.js”></script>
Next, we specify the public address of the contract. Replace the below address with the address of the contract you created for this use case. (Tip: Click on the newly created contract address in Ethereum Wallet and select copy address on the contract page)
var contract_address = “0x0EfBae3f8e3bc34b4A77E07c75dFd9f9A32f6bA2”;
Next, we will initialize a variable with the contract details in JSON format. To get these details, click the Show Interface icon, as shown below, on the contract page and you will the relevant contract information in JSON format.
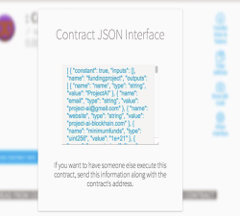
We have defined the contract_abi variable and initialized it with the above contract details.
var contract_abi = [ { “constant”: true, “inputs”: [], “name”: “fundingproject”, “outputs”: [ { “name”: “name”, “type”: “string”, “value”: “g” }, { “name”: “email”, ….. “payable”: false, “type”: “constructor” } ]
Next, we create the Web3 instance by providing the endpoint address of our running Ethereum instance.
web3 = new Web3(new Web3.providers.HttpProvider(“http://127.0.0.1:8545”));
Next, we create the instance of contract by providing the contract details as part of contract_abi variable and address of the contract.
var contract_instance = web3.eth.contract(contract_abi).at(contract_address);
In our HTML page, we have added a button named Stop Fund Raising, once clicked will invoke the getStatus() method. The getStatus() method calls the stopFundRaising() method on the contract instance. To execute the operations on the contract, we also provide the account (the Main Account for this example), which would pay the transaction fee to execute this transaction on the blockchain network. While running this, replace the ‘passw0rd’ value in the unlockAccount method below, with the password of your Main account.
The following shows the getStatus() method.
function getStatus() {

//Unlock main Ether Base account and replace password with your account password
//This is a demo setup only, get this value through secured login credentials in actual environment
            web3.personal.unlockAccount(web3.eth.accounts[0], 'passw0rd');
//Call the Stop Fund Raising method
            contract_instance.stopFundRaising({from: web3.eth.accounts[0]}, function(error, result) {
                if(error) {
                    console.error(error);
                } else {
                    var hash = result;
                    console.log("hash"+hash);
                    checkHashStatus(hash, updateStatusFromContract);
                }
            });
        }
Now, once the stopFundRaising method is executed, the transaction will be committed as a block in the blockchain network. As we are running this on the local network, it shouldn’t take more than a minute or so to execute. To track the transaction, we will store the returned hashed value of the submitted transaction. We then call the getTransactionReceipt() method passing the hash value as a parameter. The said method will be invoked recursively every one minute to check for the valid returned object. If the method returns a valid object, it implies the block is committed, and the transaction is complete. The following code snippet shows the checkHashStatus() which makes a call to the getTransactionReceipt() of the web3 API:
function checkHashStatus(hash, callback) {
web3.eth.getTransactionReceipt(hash, function(error, rcpt) {
                if(error) {
                    console.error(error);
                } else {
                    if(rcpt == null) {
                        setTimeout(function() {
//call iteratively till hash matches and block is mined
                            checkHashStatus(hash, callback);
                        }, 1000);
                    } else {
                        console.log(rcpt)
                        //call the function once block is committed
                        callback();
                    }
                }
            })
        }
We also print the response from the getTransactionReceipt() method on the browser console, and you can verify the hash, block number, address (contract address) and other details like gas used for this transaction.
{blockHash: “0x739f8a73aa5e7ccca62be65d2f43be732c82ac02693d298ce2af64354be9ee1b”, blockNumber: 39659, contractAddress: null, cumulativeGasUsed: 32083, from: “0x6b8dc00c09dd3c240c0b964ccec6baf07ab038a5”, to:”0x290298bf15d9546850161e3046233801f2488523″…}
Once we receive the transaction receipt, we print the status of the project on the html page as shown below. The status is fetched by invoking the getProjectStatus() method on the contract instance. The method returns the status as ‘Funding Stopped’.
document.getElementById(“status”).innerText = contract_instance.getProjectStatus();
This completes one end-to-end transaction of a web application invoking a smart contract.
Note – The above example uses ether tokens for crowdfunding. As a next step, you can create your own digital token for crowdfunding. You can extend the ECR20 Token Contract (https://theethereum.wiki/w/index.php/ERC20_Token_Standard) as the starting point to create your own Initial Coin offering (ICO) and club it with the crowd funding contract logic, which will use your coins for fund raising. Investors/Participant would invest in your idea by buying your tokens with a hope that their investment and value in tokens multiplies based on the success of the funded project.
In the next article, we look at some of the challenges of Ethereum platform