In this third installment of the Spring Series, I introduce you to the Spring Model-View-Controller (MVC) framework. As in the previous articles, I use a banking example to show you how to model and build a simple application. The example application will encompass some of the techniques you’ve already learned — such as dependency injection — but will primarily demonstrate features of Spring MVC.
Download the article source before you begin.
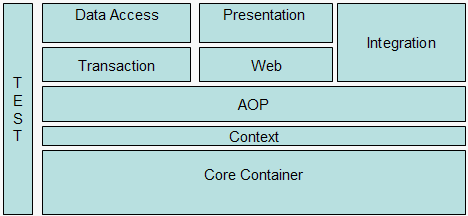
The Spring framework provides a full-featured MVC module for building Web applications. With Spring’s pluggable MVC architecture, you can choose whether you want to use the built-in Spring Web framework or a Web framework such as Struts. The framework is highly configurable through strategy interfaces and accommodates multiple view technologies such as JavaServer Pages (JSP) technology, Velocity, Tiles, iText, and POI. The Spring MVC framework is view agnostic, so does not push you to use only JSP technology. Spring MVC separates the roles of the controller, the model object, the dispatcher, and the handler object, which makes them easier to customize.
Spring’s Web MVC framework is designed around a DispatcherServlet that dispatches requests to handlers, with configurable handler mappings, view resolution, locale, and theme resolution as well as support for upload files. The default handler is a very simple Controller interface with just one method, ModelAndView handleRequest(request, response). Spring provides a controller hierarchy that can be subclassed. If your application needs to process user entry forms you might subclass AbstractFormController. If you need to process a multi-page entry into a single form you can subclass AbstractWizardFormController.
An example application will help you learn about these features first hand. The banking application will allow users to retrieve their account information. In the process of building it, you’ll learn how to configure the Spring MVC framework and implement the framework’s view layer, which will consist of JavaServer Pages technology with JSTL tags for rendering the output data.
To start building the example application, configure Spring MVC’s DispatcherServlet. Register all configurations in your web.xml file. Listing 1 shows how to configure the sampleBankingServlet.
Listing 1. Configuring the Spring MVC DispatcherServlet
| <servlet> <servlet-name>sampleBankingServlet</servlet-name> <servlet-class> org.springframework.we.servlet.DispatcherServlet <servlet-class> <load-on-startup>1<load-on-startup> <servlet> |
The DispatcherServlet loads a Spring application context from the XML file whose name is based on the name of the servlet, with -servlet appended to it. In this case, the DispatcherServlet will load its application context from the sampleBankingServlet-servlet.xml file.
The next step is to configure the URLs that you want the sampleBankingServlet to handle. Again, you will register these configurations in the web.xml file.
Listing 2. Configure the URLs that you want to handle
| <servlet-mapping> <servlet-name> sampleBankingServlet<servlet-name> <url-pattern>*.jsp</url-pattern> </servlet-mapping> |
Next, load the configuration files. To do this, register the ContextLoaderListener for Servlet 2.3 specifications or ContextLoaderServlet for Servlet 2.2 containers and below. Use ContextLoaderServlet for backward compatibility. The ContextLoaderServlet will load the Spring configuration files when you start the Web application. Listing 3 registers the ContextLoaderServlet.
Listing 3. Register the ContextLoaderServlet
| <servlet> <servlet-name>context>servlet-name> <servlet-class> org.springframework.web.context.ContextLoaderServlet </servlet-class> <load-on-startup>1</load-on-startup> </servlet> |
The contextConfigLocation parameter defines the Spring configurations files to load, as shown in the servlet context below.
| <context-param> <param-value>contextConfigLocation</param-value> <param-value>/WEB-INF/sampleBanking-services.xml</param-value> </context-param> |
The sampleBanking-services.xml file represents the configuration and bean configuration of services for the example banking application. If I wanted to load multiple Spring configuration files, I could use a comma as a delimiter in a <param-value> tag.
The example banking application allows users to view account information based on a unique ID and password. Although Spring MVC offers other options, I’ll use JSP technology for my view pages. This simple application will consist of one view page for user input (ID and password) and a second page to display the user’s account information.
I start with a LoginBankController that extends Spring MVC’s SimpleFormController. SimpleFormContoller provides the functionality to display the form upon receiving an HTTP GET request and process the same form data upon receiving an HTTP POST. LoginBankController uses AuthenticationService and AccountServices services for authentication and carrying out account activities. Listing 5 in “Configure view properties” describes how to wire AuthenticationService and AccountServices to LoginBankController. Listing 4 shows the code for the LoginBankController.
Listing4 : LoginBankController
public class LoginBankController extends SimpleFormController {

public LoginBankController(){

}

protected ModelAndView onSubmit(Object command) throws Exception{

LoginCommand loginCommand = (LoginCommand) command;

authenticationService.authenticate(loginCommand);

AccountDetail accountdetail = accountServices.getAccountSummary(loginCommand.getUserId());

return new ModelAndView(getSuccessView(),"accountdetail",accountdetail);

}

private AuthenticationService authenticationService;

private AccountServices accountServices;

public AccountServices getAccountServices() {

return accountServices;

}

public void setAccountServices(AccountServices accountServices) {

this.accountServices = accountServices;

}

public AuthenticationService getAuthenticationService() {

return authenticationService;

}

public void setAuthenticationService(

AuthenticationService authenticationService) {

this.authenticationService = authenticationService;

}

}
Next, I must register the page that displays on receipt of the HTTP GET request. I register the page in the Spring configuration using the formView property, as Listing 5 shows. The sucessView property represents the page which displays after form data is posted and logic is successfully executed in the doSubmitAction() method. Both the formView and sucessView properties represent the logical name of the view defined, which maps to the actual view page.
Listing 5. Register the LoginBankController
| <bean id=”loginBankController” > <property name=”sessionForm”><value>true</value></property> <property name=”commandName”><value>loginCommand</value></property> <property name=”commandClass”> <value>springexample.commands.LoginCommand</value> </property> |
<property name=”authenticationService”>
<ref bean=”authenticationService” />
</property>
<property name=”accountServices”>
<ref bean=”accountServices” />
</property>
<property name=”formView”>
<value>login</value>
</property>
<property name=”successView”>
<value>accountdetail</value>
</property>
</bean>
The commandClass and commandName tags determine the bean that will be active in the view page. For example, the loginCommand bean will be accessible through login.jsp, which is the application’s login page. Once the user submits the login page, the application can retrieve the form data from the command object in the onSubmit() method of the LoginBankController.
Spring MVC’s view resolver resolves each logical name to an actual resource, that is a JSP file that contains account information. I use Spring’s InternalResourceViewResolver, as shown in Listing 6.
Listing 6. The InternalResourceViewResolver
| <bean id=”view-Resolver”
> <property name=”viewClass”> <value>org.springframework.web.servlet.view.JstlView</value> </property> <property name=”prefix”><value>/jsp/</value></property> <property name=”suffix”><value>.jsp</value></property> </bean> |
The user’s login name resolves to the resource /jsp/login.jsp and the viewClass becomes JstlView, since I’ve used JSTL tags in my JSP pages.
Authentication and account services
As previously noted, the LoginBankController has Spring’s AccountServices and AuthenticationService wired into it. The AuthenticationService class handles authentication for the banking application. The AccountServices class handles typical banking services such as viewing transactions and wire transfers. Listing 7 shows the configuration for the banking application’s authentication and account services.
Listing 7. Configuring authorization and account services
| <beans>
<bean id=”accountServices” </bean> <bean id=”authenticationService” </bean> </beans> |
You register the above services in the sampleBanking-services.xml, which is then loaded in a web.xml file, as previously discussed. With the controller and services configured, this simple application is complete. Now let’s see what happens when I deploy and test it!
I deploy the example application in a Tomcat servlet container. Tomcat is the servlet container that is used in the official reference implementation for the Java Servlet and Java ServerPages technologies. If you’ve not already done so, download jakarta-tomcat-5.0.28.exe and run it to install Tomcat to any location you’d like — c:\tomcat5.0, for instance.
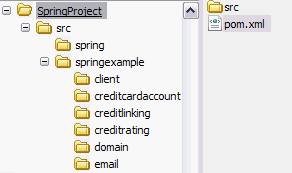
Next, download the example code and extract it to a drive, say c:\. Once you create the Spring project folder, open it and copy the spring-banking subfolder into c:\tomvat5.0\webapps. The spring-banking folder is a Web archive that contains the Spring MVC example application. The lib folder contains the Spring framework, Spring-related MVC libraries, and JSTL tag libraries and jar files required by the application.
To start the Tomcat server, issue the following command:
cd bin C:\Tomcat 5.0\bin> catalina.bat start
Tomcat should start up and deploy the Spring MVC example application.
To test the application, open your Web browser and point to http://localhost:tomcatport/springbanking and replace tomcatport with the port where you run your Tomcat server. You should see the login screen shown in Figure 1. Type in the user ID of “admin” and the password of “password” and press the Login button. Any other user ID or password will result in an error from the authorization service.
Figure 1. Spring MVC example login screen

Once you successfully log in, you’ll see the account detail page shown in Figure 2.
Figure 2. Spring MVC example account detail screen

In this third article in the Spring series, I introduced you to the features of the Spring MVC framework. I showed you how to configure and develop a Spring MVC application, how to configure and inject dependencies into Spring MVC controllers, and how to develop application views using JavaServer Pages technology, as well as how to integrate your pages with the Spring MVC view layer. To conclude the article, I showed you how to deploy the application in a Tomcat servlet container and test it in your browser.
Stay tuned for the next article in the Spring series, in which I’ll show you how to integrate JMS-based applications with the Spring framework.
This article of mine was first published by IBM DeveloperWorks.All rights retained by IBM and the author.

