In this fourth and final installment of the Spring Series , I introduce you to features of the Spring JMS (Java Message Service) framework. JMS defines a standard way for Java applications to create and exchange messages through a Message Oriented Middleware (MOM).
As in the previous articles of this series, I use a simple example to demonstrate the features of Spring JMS. You’ll follow along as I develop a point to point (P2P) message-based system, using the Spring JMS framework to integrate with IBM’s WebSphere MQ through a JMS Interface. Upon completing the exercise, you’ll be able to send and receive simple text messages through the system.
Download the article source before you begin. The examples was tested on IBM WebSphere MQ 5.3. You will also need Apache Ant to run the example application.
Spring’s JMS abstraction framework simplifies the use of JMS APIs and smoothly integrates with JMS providers such as IBM’s WebSphere MQ 5.3. The package org.springframework.jms.core provides the core functionality for using JMS in Spring. Its template classes simplify the use of the JMS by handling the creation and release of resources.
Like most other Spring template classes, the JMS template classes provide helper methods that perform common operations. In cases that require more sophisticated usage, the classes delegate the essence of the processing task to user-implemented callback interfaces. The JMS classes offer convenience methods for sending a message, consuming a message synchronously, and exposing a JMS session and message producer to the user.
Along with org.springframework.jms.core, the following JMS packages comprise Spring JMS functionality:
- org.springframework.jms.support
- Provides functionality to translate JMSExceptions. The translation code converts the checked JMSException hierarchy to a mirrored hierarchy of unchecked exceptions.
- org.springframework.jms.support.converter
- Provides a MessageConverter abstraction to convert between Java objects and JMS messages.
- org.springframework.jms.support.destination
- Provides various strategies for managing JMS destinations, such as a service locator for destinations stored in JNDI.
- org.springframework.jms.connection
- Provides an implementation of the ConnectionFactory suitable for use in standalone applications. The connection package also contains an implementation of Spring’s PlatformTransactionManager for JMS. This allows for the integration of JMS as a transactional resource into Spring’s transaction management mechanisms.
As previously mentioned, the example application will use the Spring JMS framework to integrate with IBM’s WebSphere MQ through a JMS Interface. WebSphere MQ provides reliable, resilient application integration by passing messages between applications and Web services. It uses queuing and transactional facilities to help preserve the integrity of messages across the network. WebSphere MQ reduces the risk of information loss and the need to reconcile communicating IT systems.
WebSphere MQ provides a consistent application programming interface (MQI) across all its supported platforms, which helps make integrated programs portable. In addition to its standard interface, WebSphere MQ also fully implements the JMS interface, including support for publish-and-subscribe messaging. The WebSphere MQ Explorer tool enables the entire MQ network to be administered and configured remotely. The administration and configuration tool is based on the open source Eclipse framework and is extensible.
The Spring framework provides two implementations of the JmsTemplate. The class JmsTemplate uses the JMS 1.1 API and the subclass JmsTemplate102 uses the JMS 1.0.2 API. My example application uses the JmsTemplate102.
The JMS template is used to send and receive JMS messages. Spring employs a callback mechanism to coordinate JMS messaging. The MessageCreator callback interface creates a message given a Session provided by the calling code in JmsTemplate. To allow for more complex usage of the JMS API, the callback SessionCallback provides the user with the JMS session and the callback ProducerCallback exposes a Session and MessageProducer pair.
Listing 1 shows the configuration of the JMS template used for the example application. The listing is an extract from the spring-mqseries-jms.xml file.
Listing 1. JMS template configuration
| <!– JMS Queue Template –> <bean id=”jmsQueueTemplate” > <property name=”connectionFactory”> <ref bean=”jmsQueueConnectionFactory”/> </property> <property name=”destinationResolver”> <ref bean=”jmsDestinationResolver”/> </property> <property name=”pubSubDomain”> <value>false</value> </property> <property name=”receiveTimeout”> <value>20000</value> </property> </bean> |
The jmsQueueTemplate bean is wired with a JMS connection factory and a JMS destination resolver for resolving destination queue names supplied by JMS clients through JNDI. The connectionFactory property specifies how to get a connection to a JMS provider. In the case of the example, Listing 2 shows how to retrieve the connection factory from JNDI.
Listing 2. Configuring a JMS connection factory through JNDI
| <!– JMS Queue Connection Factory –> <bean id=”internalJmsQueueConnectionFactory” > <property name=”jndiTemplate”> <ref bean=”jndiTemplate”/> </property> <property name=”jndiName”> <value>MQ_JMS_MANAGER</value> </property> </bean> |
As you can see, the JndiObjectFactoryBean is wired to an internalJmsQueueConnectionFactory. The JndiObjectFactoryBean uses the JndiTemplate property for JNDI lookup. Spring will look up the connection factory in JNDI using the environment property and initial context specified in the JndiTemplate. Listing 3 shows the configuration of the JndiTemplate configuration bean.
Listing 3. JNDI template configuration for JNDI lookup
| <bean id=”jndiTemplate”> <property name=”environment”> <props> <prop key=”java.naming.factory.initial”> com.sun.jndi.fscontext.RefFSContextFactory </prop> <prop key=”java.naming.provider.url”> file:/C:/JNDI-Directory </prop> </props> </property> </bean> |
The above configuration specifies the initial context factory as com.sun.jndi.fscontext.RefFSContextFactory and the provider URL as the file-based file:/C:/JNDI-Directory for JNDI lookup. For the purpose of the example application, the JNDI access will use the file-based FSContext version configured for binding MQ queues to JNDI.
With the JMS template defined, the next step is to wire it into the example application, after which you can use it to send and receive messages.
The JMS template can be wired into an application to send and receive JMS messages. In Listing 4 you can see how I wired the JMS template from Listing 1 into my example application.
Listing 4. Wiring JmsTemplate into an application
| <bean id=”jmsSender” > <property name=”jmsTemplate102″> <ref bean=”jmsQueueTemplate”/> </property></bean><bean id=”jmsReceiver” > <property name=”jmsTemplate102″> <ref bean=”jmsQueueTemplate”/> </property> </bean> |
As you can see, I wired jmsQueueTemplate into both the JmsSender application bean and the JmsReceiver bean used to send and receive messages. Listing 5 shows relevant code for the JMSSender class.
Listing 5. JMSSender using JmsTemplate to send JMS messages
public class JMSSender {

 private JmsTemplate102 jmsTemplate102;

 public JmsTemplate102 getJmsTemplate102() {
 return jmsTemplate102;
 }

 public void setJmsTemplate102(JmsTemplate102 jmsTemplate102) {
 this.jmsTemplate102 = jmsTemplate102;
 }

 public void sendMesage(){
 jmsTemplate102.send("JMS_RequestResponseQueue",
 new MessageCreator() {
 public Message createMessage(Session session)
 throws JMSException {
 return session.createTextMessage("This is a sample message");
 }
 });

 }
The JMSSender class sends JMS messages with the jmsTemplate102.send() method. The first parameter to the send() method is the JNDI queue name, which specifies where messages should be sent. (You’ll see in a moment how the WebSphere MQ’s queue name is bound to JNDI.) The second parameter for the send() method is the MessageCreator class. Given a Session provided by the calling code in the JmsTemplate, this class provides a callback interface to create a JMS message.The next step is to create a simple text message using the JMS Session class. The message will be delivered to the WebSphere MQ server’s queue on the execution of the code. Listing 6 shows the JMSReceiver application bean code using the JmsTemplate to receive a JMS message.
Listing 6. JMSReceiver using JmsTemplate to receive a JMS message
 public class JMSReceiver {

 private JmsTemplate102 jmsTemplate102;

 public JmsTemplate102 getJmsTemplate102() {
 return jmsTemplate102;
 }

 public void setJmsTemplate102(JmsTemplate102 jmsTemplate102) {
 this.jmsTemplate102 = jmsTemplate102;
 }

 public void processMessage(){
 Message msg = jmsTemplate102.receive("JMS_RequestResponseQueue");
 try{
 TextMessage textMessage = (TextMessage) msg;
 if( msg!=null){
 System.out.println(" Message Received -->" +
 textMessage.getText());
 }

 }catch(Exception e){
 e.printStackTrace();
 }

 }
}
The JMSReceiver class uses the jmsTemplate102.receive() method to receive JMS messages synchronously.The receive() method specifies the JNDI queue name from which to retrieve messages. The processMessage() method of JMSTemplate class will be called by the receiving JMS clients. The JSMTemplate bean property receiveTimeout (listed in the JMSTemplate configuration) specifies the amount of time receiving clients will wait to synchronously receive messages from the queue.And with that the application code is done! My next step is to configure the WebSphere MQ queues and bind them to JNDI objects.
Queue manager setupBefore I can run the application, I need to set up the WebSphere MQ queue manager and queues and bind them to JNDI. You can follow along with this part of the example, if you like: just download the batch file for setting up the WebSphere MQ queues and the source code and deployment descriptors for the application. Extract the zip file to your C: drive.Set up the queues
Run the mqsetup.bat file provided in the C:\SpringSeriesPart4JMS\batch folder. This batch file requires that you set in your environment path variable the bin folder of an MQ installation (such as C:\mqseries\bin). After running the batch file, you should see the message “All valid MQSC commands were processed.” To open the MQ Explorer and check that queue managers and queues were created, select Start -> Programs -> IBM MQSeries -> MQSeriesExplorer. Figure 1 shows that the example application QueueManager MQJMS.QManager was created and is running.
Figure 1. QueueManager Configuration for WebSphere MQ
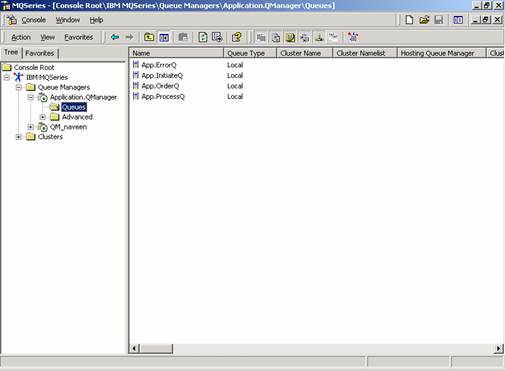
 Click the Queues folder below MQJMS.QManager on the left pane of your application screen. You should see that one queue RequestResponseQueue was also created, as seen in Figure 2.
Figure 2. Request/response queue configuration for WebSphere MQ
 This completes the setup of queues.Set up JMS and JNDI administrationIn the example application, the JNDI access makes use of the file-based FSContext version available from the JNDI homepage. The FSContext.jar file is also included as part of WebSphere MQ’s JMS support. Add the folders \MQSeriesInstallable\MQSeries\Java\lib and \MQSeriesInstallable\MQSeries\Java\bin to your system’s PATH environment variable. Also, add all the jar files in the \MQSeriesInstallable\MQSeries\Java\lib folder to your system’s CLASSPATH environment variable. You can also run the classpath.cmd batch file provided in the C:\SpringSeriesPart4JMS\batch folder, which sets the necessary path and CLASSPATH variables. To do so, just modify the MQ_JAVA_INSTALL_PATH variable in the classpath.cmd file to point to your WebSphere MQ JMS installation directory.Next, modify the JMSAdmin.config configuration file in the \MQSeriesInstallableDirectory\Java\bin used by the MQSeries JMS administration to indicate the context factory and address of the JNDI implementation that the application will use. Uncomment the following line:
INITIAL_CONTEXT_FACTORY=com.sun.jndi.fscontext.RefFSContextFactory |
and comment out the remaining two INITIAL_CONTEXT_FACTORY variables. Also uncomment the following line:
PROVIDER_URL=file:/C:/JNDI-Directory |
and comment out the remaining two PROVIDER_URL variables.
You’ll find a sample configuration file provided for reference in the C:\SpringSeriesPart4JMS\batch folder.
To store JNDI objects, make a directory named JNDI-Directory on your C: drive. Switch over to the \MQSeriesInstallableDirectory\Java\bin directory and run the JMSAdmin batch file and you should see the the InitCtx variable.
Type in the following, one after the other:
def qcf(MQ_JMS_MANAGER) qmgr(MQJMS.QManager)
press Enter
def q(JMS_RequestResponseQueue) qmgr(MQJMS.QManager)
queue(RequestResponseQueue)
press Enter
You have now bound the WebSphere MQ queues to JNDI objects, which can be looked up as application clients through JNDI. All that is left to do is see the code in action!
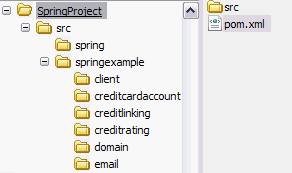
Running the exampleTo run the example, download the Spring framework and all its dependency files from spring sourceforge download and extract it to, for example, c:\. The folder C:\spring-framework-1.2-rc2 (or latest versions) will be created.To run the Spring application, extract the article source code to any folder, such as c:\. The folder SpringSeriesPart4JMS will be created. As previously mentioned, you will also need to have Apache Ant and its Spring dependency jar files installed. Copy the Spring libraries — namely spring.jar from C:\spring-framework-1.2-rc2 \dist and commons-logging.jar — from C:\spring-framework-1.2-rc2\lib\jakarta-commons to the SpringSeriesPart4JMS\lib folder. Also copy all jar libraries from the \MQSeriesInstallableDirectory\Java\lib directory to the SpringSeriesPart4JMS\lib folder. This contains MQseries and JMS-related libraries. You now have the build dependency set.Next, open up the command prompt and change the directory to SpringProject4 and type the following at command prompt:
| > ant -f build-jmssender.xml. |
This will build and run the SendMQSpringJMS class, which calls the JMSSender class for sending a text message to the WebSphere MQ RequestResponse queue. SendMQSpringJMS also loads the spring configuration files through its ClassPathXmlApplicationContext. Once the beans are loaded, JMSSender can be accessed through the Spring ApplicationContext getBean() method (see Listing 7).
Listing 7. Loading the Spring configuration for the example application
ClassPathXmlApplicationContext appContext =
 new ClassPathXmlApplicationContext(new String[] {
 "spring-mqseries-jms.xml"
 });

JMSSender jmsSender = (JMSSender)
 appContext.getBean("jmsSender");
Once the message is delivered on the queue, run the JMS receiver client to retrieve it. Open up the command prompt, change the directory to SpringProject4, and type:
| > ant -f build-jmsreceiver.xml |
This will build and run the ReceiveMQSpringJMS class, which calls the JMSReceiver class to receive a text message from the WebSphere MQ RequestResponse queue. The following message prints at the console:
| Message Received –> This is a sample message. |
In this final article in the Spring series, you learned the fundamentals of the Spring JMS framework. I first introduced the essential components of the example application — the Spring JMS framework and IBM’s WebSphere MQ 5.3 — then showed you how to use a Spring JMS templates to send and receive messages from the WebSphere MQ queue. While the example is very simple, you can apply the outlined steps to applications of greater complexity.
I hope this series introducing the essential modules of the Spring framework has been useful to you. The Spring series was written on Spring framework 1.0 release in June 2005. This article of mine was first published by IBM DeveloperWorks. All rights retained by IBM and the author.

