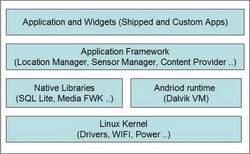
This is ongoing blog on Getting Started with Android. In earlier blog, I provided an architecture overview of android application, followed by setting up the development environment for Android and creating and running a simple application.
In this blog, I would describe how to invoke web services (soap based services) via Android. In my next blog, I would follow it up with how to invoke REST based services. For trying out the tutorial, you need to have the android development environment setup as mentioned in my previous blog.
There are two ways in which invoke web services
- Raw APIs : Use the HttpClient and XML parser to manually create a soap request and parse the soap response.
- Using a soap client library : like KSOAP library which does the low level work for parsing and dealing with soap messages – For Android, there is library available at http://code.google.com/p/ksoap2-android/ . Its good to see some active development for KSOAP 2, I remembered I wrote the first article on KSOAP 2 way back in 2003 ( http://naveenbalani.com/index.php/2010/05/deliver-web-services-to-mobiles/)and good to see it back in development for android.
I would start development with the later approach, but I plan to use RAW APIs in the follow up post –
Download the KSOAP2 library , go to http://code.google.com/p/ksoap2-android/ , click on downloads link on the menu, and download the latest release artifact – http://code.google.com/p/ksoap2-android/source/browse/m2-repo/com/google/code/ksoap2-android/ksoap2-android-assembly/2.5.2/ksoap2-android-assembly-2.5.2-jar-with-dependencies.jar . In the release artifact page, click on “View raw file” and select “Save Link as” and download the jar file which has all the required dependencies.
Next we would create a sample android project which would invoke a .NET web service. I decided to host a simple .NET web service in my website , so it would easier for you all to try out the sample . The web service is available at http://naveenbalani.com/WassupAndroid.asmx
This is a simple .NET service, with one operation called todayMessage(), which display “Wassup Android from a .NET application “ as output.
To create an andrioid project. Start eclipse.
- Select File > New > Project.
- Select Android > Android Project, Click Next.
- Enter the following information for the project –
Project name – AndroidClientService
Build Target – Android 2.3
Application name – WasuppTodaysMessage
Package name – org.android.websevice.client.samples
Create Activity – AndroidClientService
Min SDK Version – 9
- Click Finish
This would create a Project called AndroidClientService in your workspace.
Next , add the ksoap2-andriod dependency to the project. Select the AndroidClientService, click properties , click on Java build path , click on Libraries , select Add External Jars and add the ksoap2 library (ksoap2-android-assembly-2.5.2-jar-with-dependencies.jar) and click Ok.
Next, open up the WasuppServiceClientAndroid class and replace the onCreate method with the following onCreate() method as shown in listing below. Following shows the complete code listing.
This project would invoke the web service and display – “ “ on the device when the application is executed. To build the project, select Project -> Clean
package android.websevice.client.samples;

import org.ksoap2.SoapEnvelope;
import org.ksoap2.serialization.SoapObject;
import org.ksoap2.serialization.SoapSerializationEnvelope;
import org.ksoap2.transport.HttpTransportSE;

import android.app.Activity;
import android.os.Bundle;
import android.widget.TextView;

public class AndroidClientService extends Activity {

private static final String SOAP_ACTION = "http://www.naveenbalani.com/webservices/WassupAndroidService/todaysMessage";

private static final String OPERATION_NAME = "todaysMessage";

private static final String WSDL_TARGET_NAMESPACE = "http://www.naveenbalani.com/webservices/WassupAndroidService/";

private static final String SOAP_ADDRESS = "http://naveenbalani.com/WassupAndroid.asmx";

@Override
public void onCreate(Bundle savedInstanceState) {
super.onCreate(savedInstanceState);

TextView textView = new TextView(this);

setContentView(textView);

SoapObject request = new SoapObject(WSDL_TARGET_NAMESPACE,
OPERATION_NAME);

SoapSerializationEnvelope envelope = new SoapSerializationEnvelope(
SoapEnvelope.VER11);
envelope.dotNet = true;

envelope.setOutputSoapObject(request);

HttpTransportSE httpTransport = new HttpTransportSE(SOAP_ADDRESS);

try

{

httpTransport.call(SOAP_ACTION, envelope);

Object response = envelope.getResponse();

textView.setText(response.toString());

}

catch (Exception exception)

{

textView.setText(exception.toString());

}

}
}
To run the AndroidClientService Android application, click on it and select Run As > Android Application.
On the eclipse console, you would see the following similar message –
[AndroidClientService] Performing android.websevice.client.samples.AndroidClientService activity launch
[AndroidClientService] Automatic Target Mode: launching new emulator with compatible AVD ‘AVD’
[AndroidClientService] Launching a new emulator with Virtual Device ‘AVD’
[AndroidClientService] Waiting for HOME (‘android.process.acore’) to be launched…
You should see the Android AVD being launched. After the above message, it takes a while (2-3 minutes) for the first time to get the Android home page on the emulator.
After the device is started, you should see the following message on console..
[AndroidClientService] Uploading AndroidClientService.apk onto device ’emulator-5554′
[AndroidClientService] Installing AndroidClientService.apk…
[AndroidClientService] Success!
[AndroidClientService] Starting activity android.websevice.client.samples.AndroidClientService on device emulator-5554
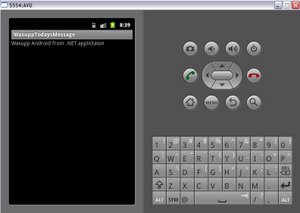
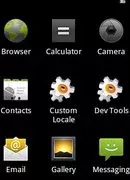
If the application doesn’t show up on the emulator, Click on Menu option on the emulator and you would see the WasuppTodayMessage android application and message being displayed.
Issues encountered during invoking the web services application from Android Emulator
- Unknown host exception –
If you get the following exception – “java.net.UnKnownHostException: naveenbalani.com’, than you need to add required domain name server which emulator would use to resolve domain.
A list of network limitations on emulator is available at – http://developer.android.com/guide/developing/tools/emulator.html#networkinglimitations
As per the documentation – “
“At startup, the emulator reads the list of DNS servers that your system is currently using. It then stores the IP addresses of up to four servers on this
list and sets up aliases to them on the emulated addresses 10.0.2.3, 10.0.2.4, 10.0.2.5 and 10.0.2.6 as needed.
On Linux and OS X, the emulator obtains the DNS server addresses by parsing the file /etc/resolv.conf. On Windows, the emulator obtains the addresses by calling the GetNetworkParams() API. Note that this usually means that the emulator ignores the content of your “hosts file”
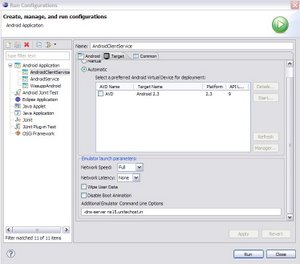
Now, to add the domain name server, click on Run configurations and select AndroidClientService and add the following
-dns-server ns15.unitechost.in
in the additional emulator command line options as shown below. Click Run to run the configuration
- Security
If you get a permission issue while accessing internet, you need to add the following line in <uses-permission android:name=”android.permission.INTERNET”></uses-permission> to allow application to access internet
Here is the complete listing of AndroidManifest.xml
<?xml version="1.0" encoding="utf-8"?> <manifest xmlns:android="http://schemas.android.com/apk/res/android" <%%KEEPWHITESPACE%%> package="android.websevice.client.samples" <%%KEEPWHITESPACE%%> android:versionCode="1" <%%KEEPWHITESPACE%%> android:versionName="1.0"> <%%KEEPWHITESPACE%%> <application android:icon="@drawable/icon" android:label="@string/app_name"> <%%KEEPWHITESPACE%%> <activity android:name=".AndroidClientService" <%%KEEPWHITESPACE%%> android:label="@string/app_name"> <%%KEEPWHITESPACE%%> <intent-filter> <%%KEEPWHITESPACE%%> <action android:name="android.intent.action.MAIN" /> <%%KEEPWHITESPACE%%> <category android:name="android.intent.category.LAUNCHER" /> <%%KEEPWHITESPACE%%> </intent-filter> <%%KEEPWHITESPACE%%> </activity> <%%KEEPWHITESPACE%%> </application> <%%KEEPWHITESPACE%%> <uses-sdk android:minSdkVersion="9" /> <uses-permission android:name="android.permission.INTERNET"></uses-permission> </manifest>
