This article demonstrates how to build a JavaTM application that accesses DB2 Everyplace Enterprise data built using the MAB, deploy it and test it locally on a Nokia Emulator. This article assists developers by:
- Providing an overview of Java development support on MAB
- Installing and configuring the Nokia Communicator 9200 SDK emulator for the sample application using MAB
- Building, deploying and testing the sample Java application
- Running the sample application
Overview of Java support on MAB
DB2 Everyplace is a relational database designed for personal digital assistants (PDAs), handheld personal computers, mobile phones, and embedded devices. DB2 Everyplace is part of IBM’s solution for mobile computing. With DB2 Everyplace, mobile professionals, such as sales people, can access vital data that they need even when they are on the road.
MAB is an integrated toolkit for developing DB2 Everyplace applications running on handheld devices. MAB makes it easy to write robust applications on a more powerful development platform (MAB is supported on Windows NT with Service Pack 4 or higher, Windows 2000 and Windows CE for deployment to handheld devices. Using the MAB builder, you can generate Java applications to support devices such as Symbian that access the DB2 Everyplace database without writing a single line of code.
Installing and configuring the tools
This article assumes that you have already installed DB2 Everyplace, MAB builder and the required tools . However, for the sample application we discuss in this article, you will have to install the Nokia 9200 Communicator SDK.
Installing the Nokia 9200 Communicator SDK
Use the following steps to install the Nokia 9200 Communicator SDK:
- Download the Nokia 9200 Communicator Series SDK for Symbian OS from http://www.forum.nokia.com. You will have to register to download the SDK. A Windows desktop emulator is included with the SDK. Please note that these procedures are based on SDK Version 1.2, and this application has been tested on Windows 2000.
- Install the SDK in the default installation directory (C:/Symbian/6.0/NokiaJava). When asked to choose the components to be installed, choose all of the components, including the Perl and JRE. If you already have a Java Development Kit (JDK) 1.2 (Java 2) or higher on your Windows desktop, you can choose to use that one and not install the JRE that comes with the installation.
- Install the DB2 Everyplace engine and JDBCTM driver on the emulator. These files are in the directory C:/DB2Everyplace/DB2e/Clients/EPOC6/DB/wins when you install DB2 Everyplace in C:/.
- Copy db2e.dll, db2e.lib, and db2ejdbc.dll to C:/Symbian/6.0/NokiaJava/Epoc32/Release/wins/urel.
- Copy db2ejdbc.jar to C:/Symbian/6.0/NokiaJava/erj/ext. The DB2 Everyplace engine does not have an install program for the Emulator at this time. This is a one-time step to be completed at setup.
Note: If you have other version(s) of Perl installed, the application build process may fail if the other Perl version appears before the Symbian SDK’s Perl in the PATH environment variable. If this happens you will have to set the PATH appropriately. Click Start -> Control Panel -> System -> Advanced -> Environment Variables -> System Variables, select PATH and click Edit. Verify that C:/Perl/bin appears before any other Perl version.
Building, deploying and testing the sample Java application
In this exercise, we will build a sample Address Book application using MAB and deploy it in the Nokia Emulator. Click Start -> Programs -> IBM DB2 Everyplace -> Mobile Application Builder to launch the MAB Environment and then follow these steps:
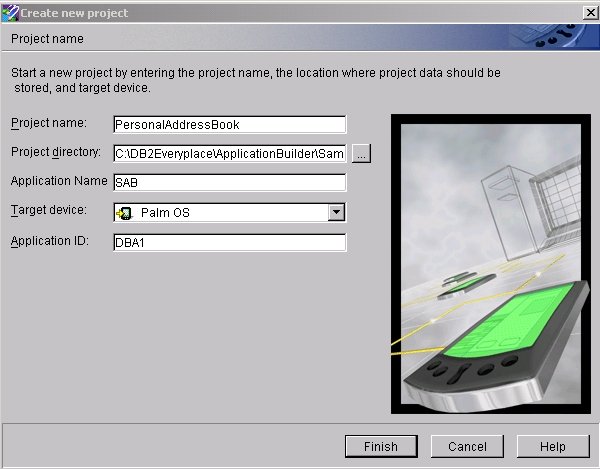
- Select the Start a new project option
- Name the project, such as JavaBook, as shown in Figure 1.
- Select SymbianOS V6-Crystal as the target device.
- By default, the application ID is 0x1000911B . When we create a new project, we have to specify the application ID that uniquely identifies the application.
- Click Finish.
Figure 1. Create a new project screen

Loading the table definitions for the sample address book
Once the project is defined, you can start loading the table definitions for the tables that will be used in the application. DB2 Everyplace MAB includes an option to import table definitions into the project file. These definitions can then be used further when creating forms or referencing columns of other tables on a form. The following steps will load the address.ddl (sample directory from 0210balani.zip file):
- Right-click on Tables and select Import Table, as shown in Figure 2, below.
- The Import table definition window opens. Select the address.ddl file that contains the definition for your tables and click on Open. When the tables are loaded, they appear under the Table section of the project tree window.
Figure 2. Importing table definitions

Building the user interface
With the table definitions loaded into the project pane, we are now ready to start creating forms for the application. There are two ways to create a form within MAB:
- Create the form manually
- Use the Form Creation wizard to automatically generate the form
This article describes how to use the Form Creation wizard. Take the following steps to create the forms:
- Right-click on the Address table and select Launch Form Creation Wizard. The Form Creation Wizard appears as shown in Figure 3 below. Select all the database columns to include in the form by checking the boxes, as shown in Figure 3.
Figure 3. Form Creation Wizard: Selecting database columns
- In the next window, choose the Database Operations that we want to associate with the forms by selecting all the boxes, as shown in Figure 4 below, and then click Finish.
Figure 4. Form Creation Wizard: Database Operations
- After taking the above steps, the Address form will be included in the Forms section. Select the Form1 and delete it, as this is a blank default form.
Analyzing the Address form
The following steps will allow you to analyze the newly created Address form.
- After selecting the Address form, on the right-hand pane you will see the Address form. At this screen, select the New button in the Address form, as shown in Figure 5.
Figure 5. Address form
- Highlight SymbianOS V6-Crystal and look into the “Database Location” in the Properties pane as shown below in Figure 6. The value associated with Database Location identifies the location of the database, which by default is \system\data\db2e. We need to set up our database tables in that location so that our application can access the tables. The value \system\data\db2e is mapped to the location where your application will be deployed. For example, if we are testing it in the Nokia Emulator and you have installed the SDK in C:\Symbian\6.0\NokiaJava, then the location of the database is C:\Symbian\6.0\NokiaJava\Epoc32\Wins\c\System\Data\db2e.
Figure 6. Database location
- When you click on the Menus option, a menu will be created for each action, such as New, Delete and so on. Click on New under Menus and then click on the Events tab at the bottom of the pane. The following screen appears, as shown below in Figure 7.
Figure 7. Creating a new menu
- Click on the value associated with the Menu Select option to display the following screen (Figure 8). You can also view events here for deleting and updating records.
Figure 8. Menu Select
- Click on the Field1Form2 value associated with the “FirstName” field in the Address form as shown below (Figure 9) and navigate to the Properties pane.
Figure 9. Choosing a value in the Address form screen
- The “Data field” property field in the Properties pane shows which value of Field1Form2 is mapped to which column in the database. “Data source” denotes the table it is mapped to. Thus, in this way all the fieldvalue values are linked to the column of the database.
Building the application
Now that we have installed and configured our tools and have set the databases up properly, we can build the application by selecting Build -> Build from the menu. If everything has been done correctly, you will get the message Application build was successful. If you get an error, make sure that you have set up the configuration properly by installing the tool and setting the path to it in the Preferences window.
Building the application creates many intermediate files. These files are used by MAB, and changing them could result in an error in your project. The following is the list of the created files:
*.java: Source files for the application
*.class: Class files of the application
*.bat: Scripts called to deploy, copy the required files to it in Nokia Emulator and start the Emulator
.aif: Application information file, Symbian platform-specific files
.app: Application file containing the UID, Symbian-platform specific files
.txt: File containing the command line parameters for pjava.exe (a JVM-executable file)
.jar: Jar files containing the classes to be deployed in Nokia Emulator
.pkg: Package files containing the list of components that need to be deployed
.sis: The file that needs to be deployed on an actual device (not the Emulator) containing all of the required classes and packages. The .sis file can be copied to the actual device using the infrared port or cable connection and the application will appear in the self-made icon “ApplicationName,” in our case “JavaBook” in the Extras screen. We will look into this when we run the application.
Testing the application
Before testing the application, we need to create our sample address book. To do this, unzip the 0210balani.zip file to any directory; a folder sample will be created. The sample directory contains BuildAddress.java, SetupAddressDB.bat and the Address.ddl files. For creating the database, modify SetupAddressDB.bat so that the set DB2EVERYPLACE_LOCATION and MAB_LOCATION to point to the location where you installed DB2 Everyplace and MAB builder. When you run SetupAddressDB.bat, it compiles and runs the BuildAddress.java file. The BuildAddress class creates the Address table in the directory C:/Symbian/6.0/NokiaJava/Epoc32/Wins/c/System/Data/db2e/, which was mapped earlier while analyzing the Address form and populates it with some dummy values. If you get an error while running the file, make sure you have set the correct path of DB2EVERYPLACE_LOCATION and MAB_LOCATION. After running SetupAddressDB.bat, you will receive the following message:
| Table: Address created
Results from table Address : FirstName= Raj , LastName= Malhotra. |
Running the application on the Nokia Emulator
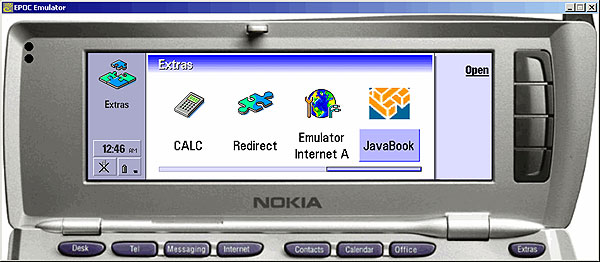
Now you can build the Nokia application by selecting Build -> Test from the Nokia menu. The Nokia Emulator will pop up, as shown below in Figure 11. Normally there is a one-minute delay as the JVM takes time to load. Navigate to the JavaBook application as shown below in Figure 11.
Figure 11. Opening the JavaBook application
Click on Open Link to open the JavaBook application. The following screen appears with the data pre-populated (which was inserted when the SetupAddressDB script was executed). See Figure 12.
Figure 12. Address data pre-populated in JavaBook
Enter the information you want to insert in the database on their respective fields and click on the F1 key of the keyboard. The menu appears as shown in Figure 13, below. Click the New button to insert the data into the database.
Figure 13. Adding new information to the database 
When you click on the F1 key, the Menu appears. Click on the Navigations menu and select Last to view the last record in the database to verify that the data is inserted properly. See Figure 14.
Figure 14. Viewing the last record in the database
You can use the various actions and navigations menus to insert and verify the information and to see the application flow.
Summary
This article shows how to use the features of DB2 Everyplace to successfully create, deploy and test our sample Java application. This application build can be transferred to an actual Nokia 9200-series device.
This article of mine was first published by IBM developerWorks. All rights reserved by IBM and author.

